Mostrando postagens com marcador VPN. Mostrar todas as postagens
terça-feira, 12 de setembro de 2023

OpenVPN: configure 2FA with Google Authenticator

0 comentários

 Fonte: https://binsec.wiki/en/security/howto/protect-hardening/authorization-and-authentication/openvpn-configure-2fa-google-authenticator/


This article explains how to configure 2FA (two factor authentication) for OpenVPN via the google authenticator PAM plugin. The configuration example below is done on a Debian bullseye Server. If you do this on a remote connection, you should have backup access to the server if something goes wrong during configuration.

Install libpam-google-authenticator on the server

After installing and configuring openvpn in general, install the package libpam-google-authenticator:

sudo apt install libpam-google-authenticator

Create a OpenVPN specific PAM configuration:

cat /etc/pam.d/openvpn < EOF
@include common-account
auth required pam_google_authenticator.so
EOF

This configuration will enable the google authenticator PAM module for the OpenVPN daemon.

In the OpenVPN configuration the following line has to be added:

plugin /usr/lib/x86_64-linux-gnu/openvpn/plugins/openvpn-plugin-auth-pam.so openvpn

Configure google-authenticator for a user

To enable the google authenticator for the VPN user, the user has to run google-authenticator on the server. The following questions during configuration setup should be answered according to your needs.

google-authenticator

Do you want authentication tokens to be time-based (y/n) y

<QRCODE>

Your new secret key is: <secret>
Your verification code is: <number>
Your emergency scratch codes are:
  <number>
  ....
Do you want me to update your "/home/user/.google_authenticator" file? (y/n) y

Do you want to disallow multiple uses of the same authentication
token? This restricts you to one login about every 30s, but it increases
your chances to notice or even prevent man-in-the-middle attacks (y/n) y

y default, a new token is generated every 30 seconds by the mobile app.
In order to compensate for possible time-skew between the client and the server,
we allow an extra token before and after the current time. This allows for a
time skew of up to 30 seconds between authentication server and client. If you
experience problems with poor time synchronization, you can increase the window
from its default size of 3 permitted codes (one previous code, the current
code, the next code) to 17 permitted codes (the 8 previous codes, the current
code, and the 8 next codes). This will permit for a time skew of up to 4 minutes
between client and server.
Do you want to do so? (y/n) y

If the computer that you are logging into isn't hardened against brute-force
login attempts, you can enable rate-limiting for the authentication module.
By default, this limits attackers to no more than 3 login attempts every 30s.
Do you want to enable rate-limiting? (y/n) y

Connect google authenticator on your smartphone

The QR-Code can now be scanned by a mobile app like Google Authenticator or similar applications on your smart phone. If a YubiKey is available, the Yubico Authenticator could also be used.

The emergency codes should be stored on a safe place e.g. a password manager like pass. They could be used to access the VPN if the access to the 2FA device get's lost.

Updating openvpn client config for google authenticator

In the openvpn client configuration, the following line has to be added:

auth-user-pass

With this line, the openvpn client will ask for a additional password before the connection is established. Now you can enter the 6 digit code on your smartphone app.
Continue reading →
quinta-feira, 25 de julho de 2019

OpenVPN: Transforme o seu Ubuntu num servidor de VPNs em apenas 5 minutos

0 comentários
Uma rede privada virtual (VPN – Virtual Private Network ) garante a segurança das comunicações ponto a ponto, nomeadamente a privacidade, integridade e autenticidade dos dados. Para isso esta tecnologia faz a encriptação dos pacotes, garantindo que estes não sejam lidos por terceiros.
Quer transformar o seu Ubuntu num servidor de VPNs em apenas 5 minutos? Siga os seguintes passos.


O OpenVPN é um software multiplataforma que permite a criação de uma VPN entre várias máquinas com sistemas operativos diferentes. Para proceder à instalação e configuração simples do OpenVPN podemos recorrer ao script openvpn-install criado pelo utilizador angristan. Para tal sigam os seguintes passos:

Passo 1) Obter o script para instalar e configurar o OpenVPN

curl -O https://raw.githubusercontent.com/Angristan/openvpn-install/master/openvpn-install.sh

Passo 2) Executar o script

Para executar o script devem definir as respetivas permissões de execução. Tal é feito através do seguinte comando:
chmod +x openvpn-install.sh
em seguida basta executar:
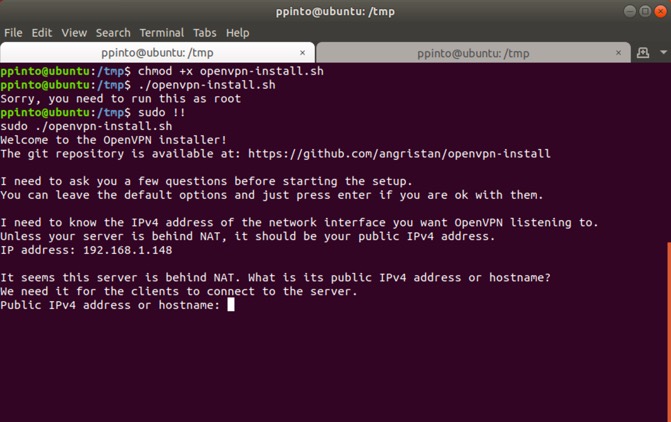
sudo ./openvpn-install.sh
Durante a configuração são solicitados alguns parâmetros.O primeiro é o endereço IP da máquina, sendo que este é obtido automaticamente pelo script.
OpenVPN: Transforme o seu Ubuntu num servidor de VPNs em apenas 5 minutos
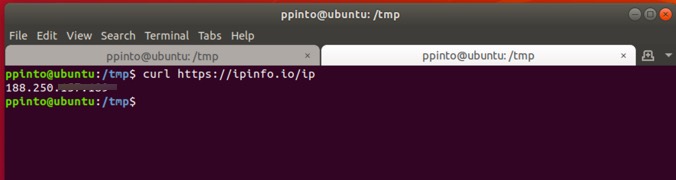
Em seguida devemos indicar o endereço público da nossa rede. Para obter esse dado podem usar o comando:
curl https://ipinfo.io/ip
OpenVPN: Transforme o seu Ubuntu num servidor de VPNs em apenas 5 minutos
O script solicitará outras informações como:
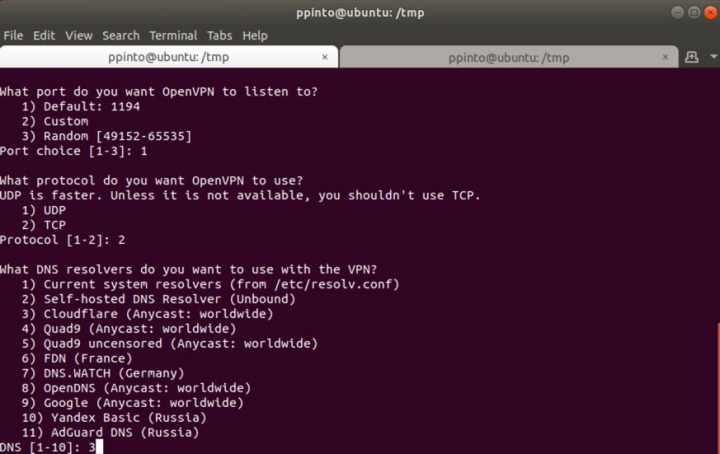
  • Número do porto lógico (1194)
  • Tipo de protocolo: TCP
  • Qual o DNS Resolver (Cloudflare)
  • Compressão (n)
  • Personalização de encriptação (n)
OpenVPN: Transforme o seu Ubuntu num servidor de VPNs em apenas 5 minutos
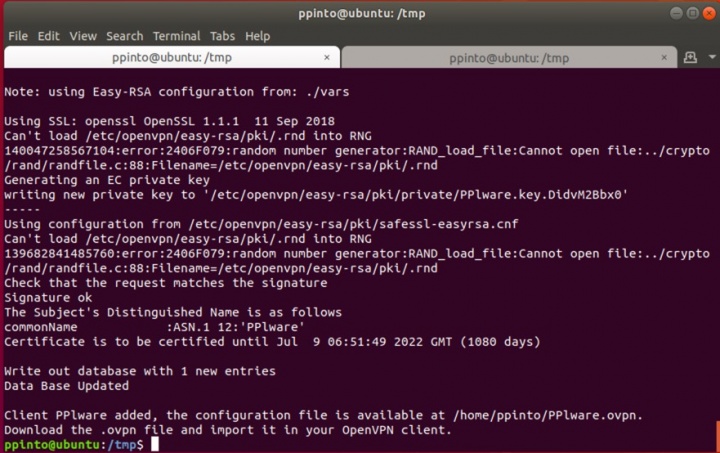
Após a configuração, o script irá fazer download dos pacotes necessários para que tudo funcione corretamente. Quase a finalizar, devem indicar um nome para o ficheiro que será usado do lado do cliente e também definir se pretendem ou não que esse ficheiro, com a configuração, seja protegido por uma password.
OpenVPN: Transforme o seu Ubuntu num servidor de VPNs em apenas 5 minutos
E está feito a parte do servidor. De forma muito simples e rápida, acabou de instalar e configurar um servidor de VPNs na sua máquina.  Num próximo tutorial vamos ensinar como podem ligar um cliente a este servidor. Estejam atentos.
Para saberem mais sobre este script devem aceder à página do projeto aqui. De referir que, além do Ubuntu, este script tem igualmente suporte para Debian, Fedora, CentOS e Arch Linux.
OpenVPN: Transforme o seu Ubuntu num servidor de VPNs em apenas 5 minutos
Continue reading →
sábado, 1 de junho de 2019

Setting up PiHole and PiVPN for privacy and security in the IoT era

0 comentários


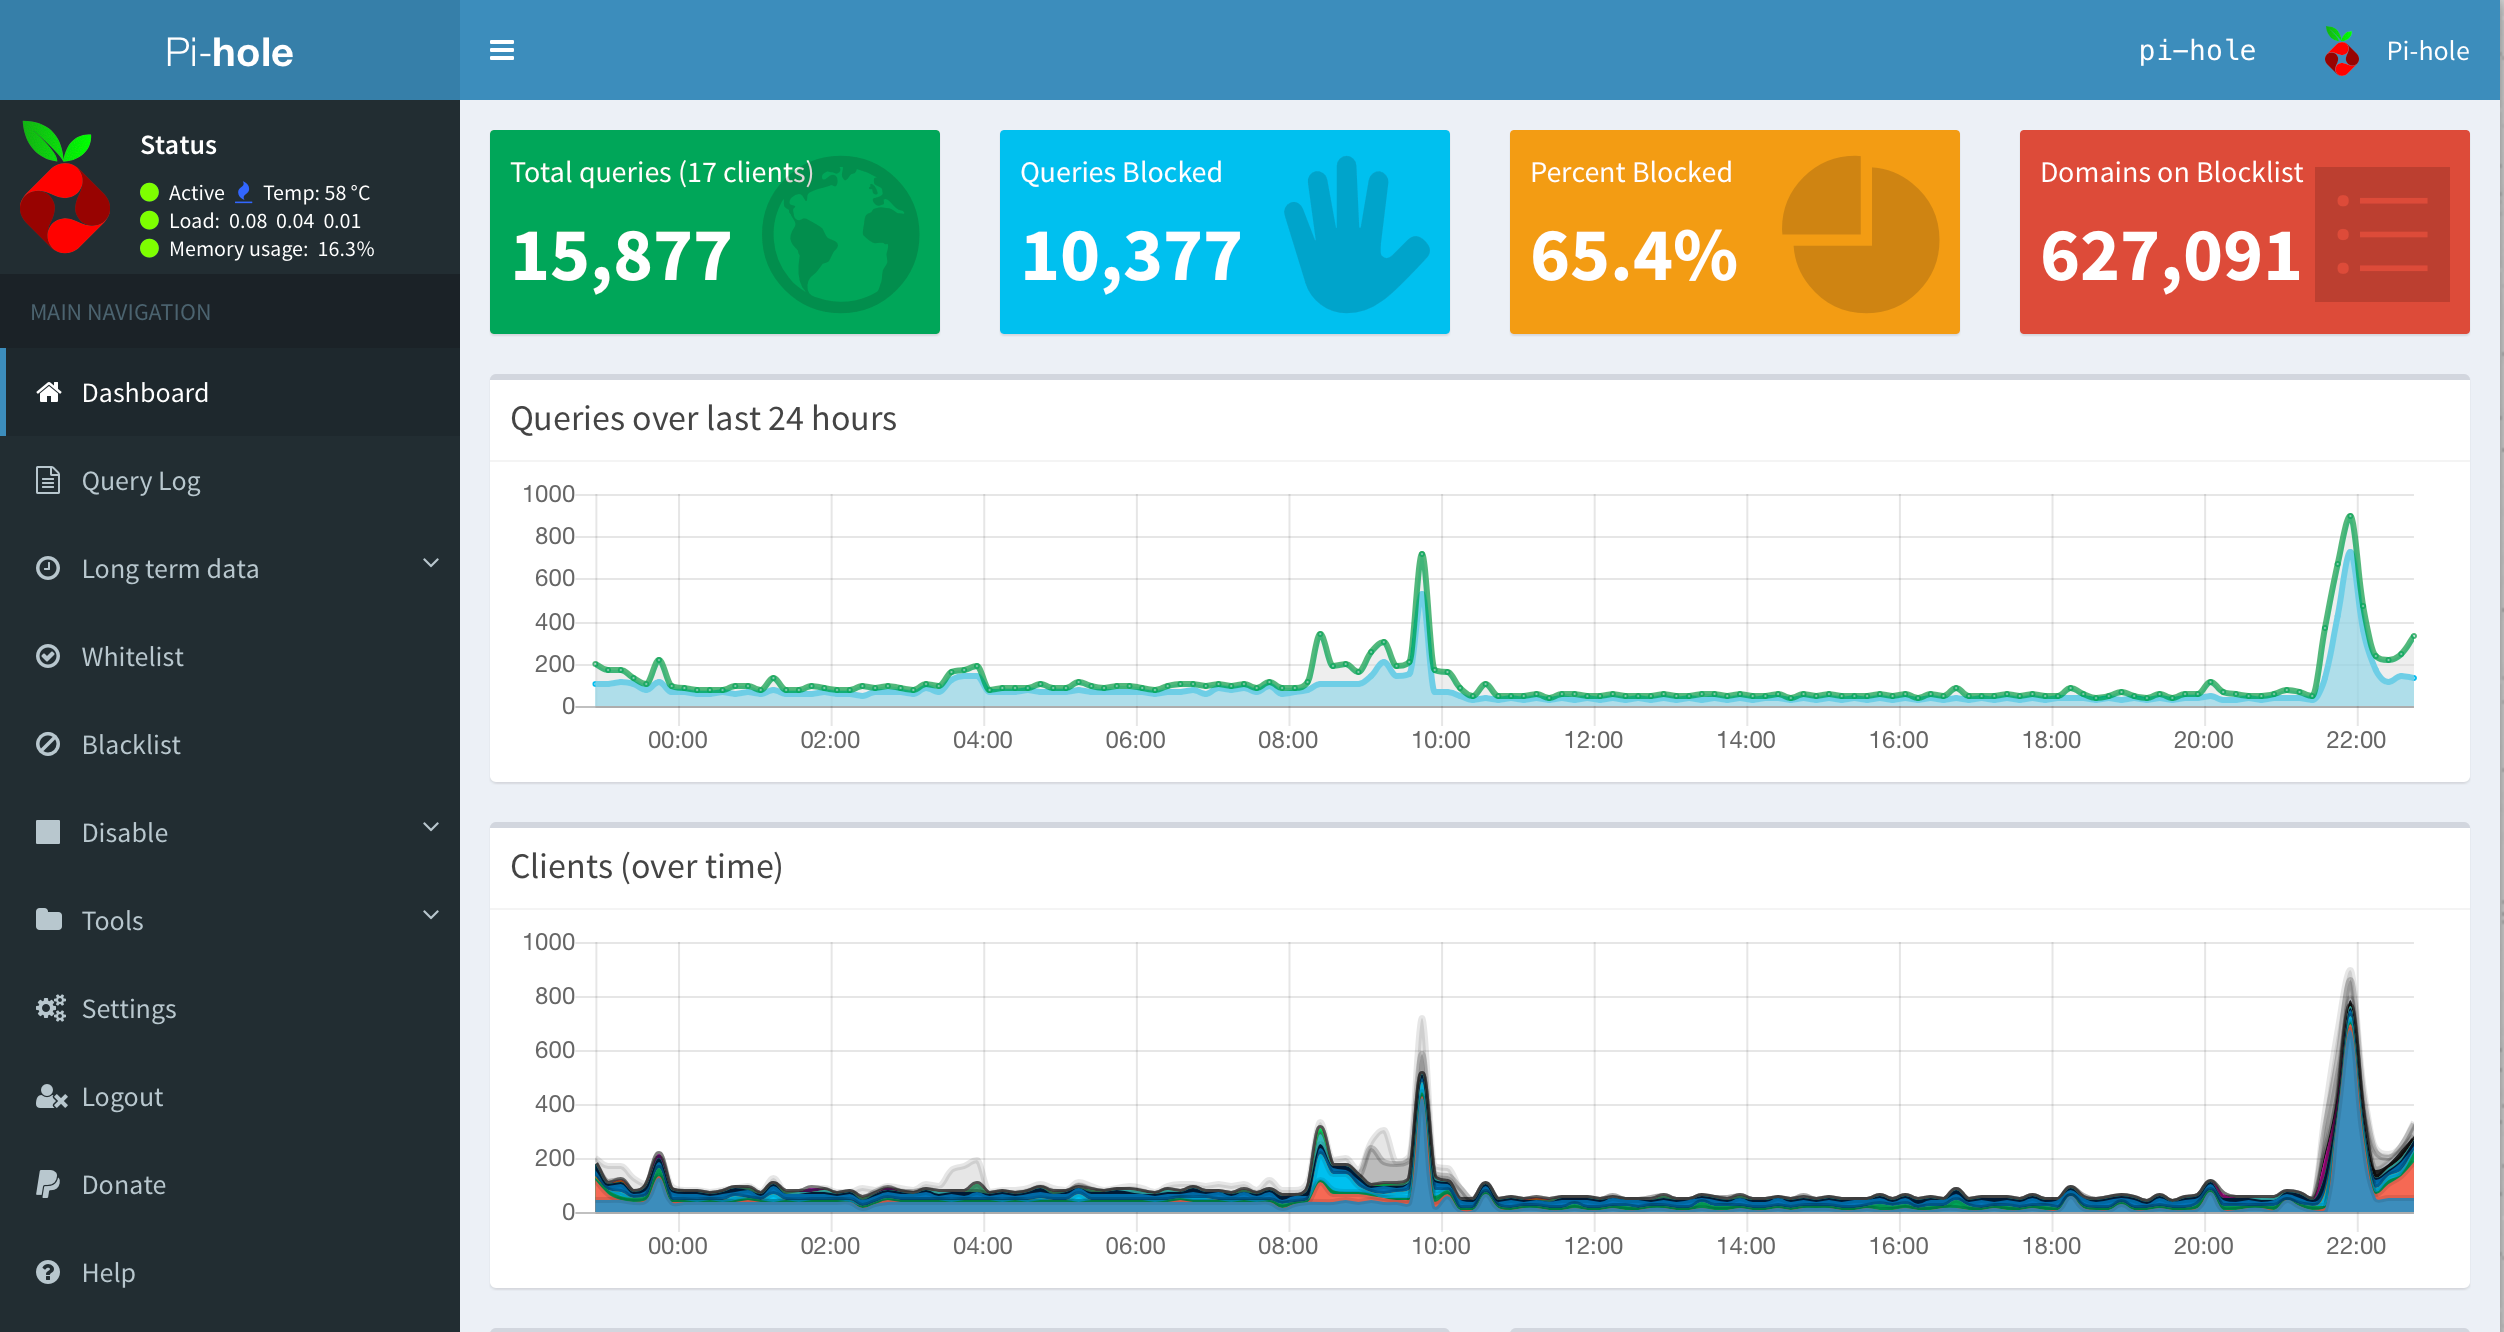
My PiHole Dashboard
Over time, I have been gathering Internet of Things (IoT) devices that make setting a timer for the laundry, watching TV and turning off lights a lot easier, but also share a lot of data about my usage and much more. Being fairly privacy conscious, it is the “much more” part that started bothering me, especially Roku’s recently updated privacy policy that describes it is collecting my Wi-Fi network name and connection data, and information about other devices connected to the same network. I have paid full price for the Roku device so it’s not offering a free service where the user is the product. But it is also not reasonable to remove all IoT devices and this kind of data gathering is only going to proliferate over time, so I decided to instead have more control over how and what data I share, by installing PiHole. I also installed PiVPN to make my home network more secure while accessing it from outside my home.


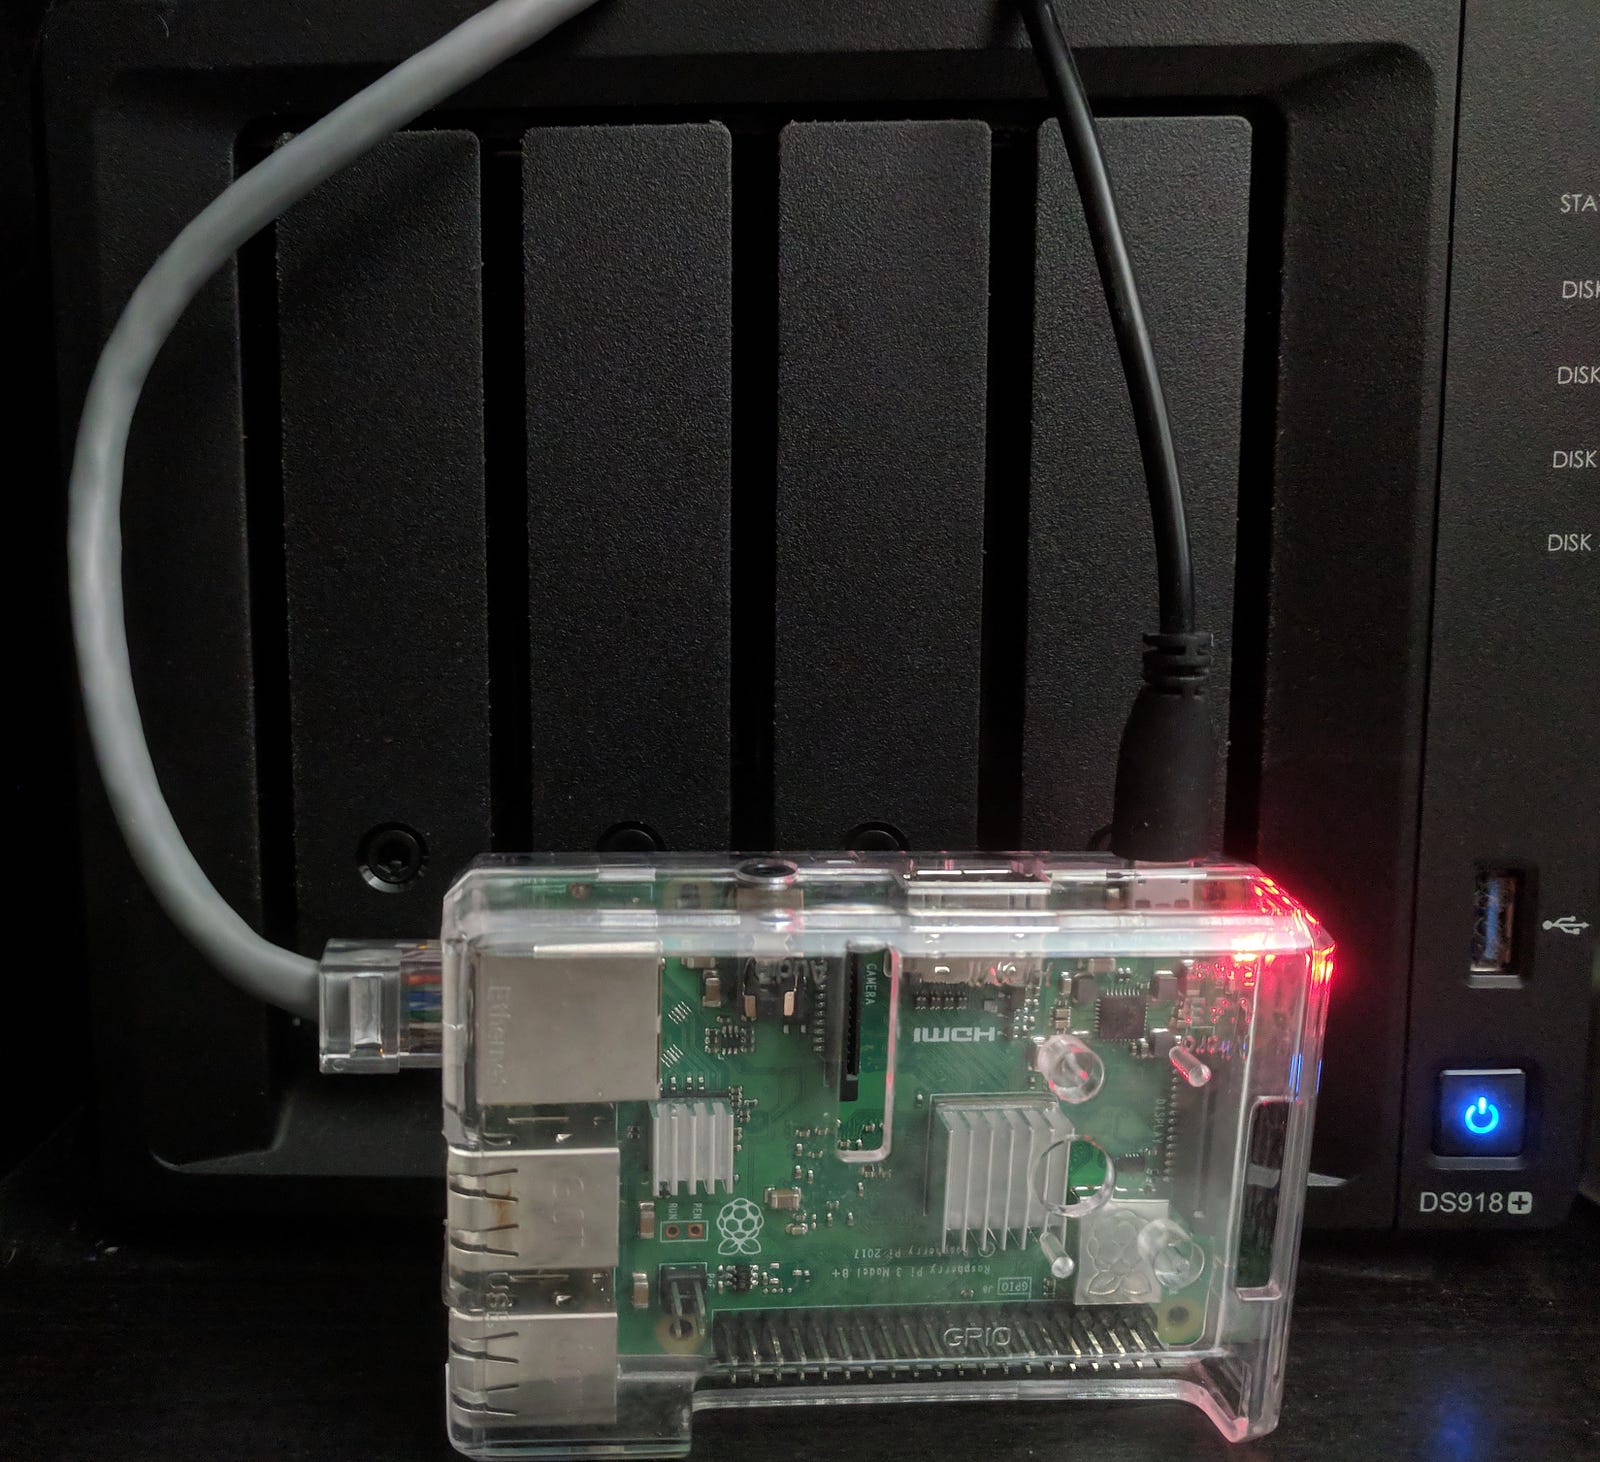
My Raspberry-Pi and Synology NAS

Equipment and Setup

This is the equipment that needed to work with my setup —
  • ARRIS BGW210–700 modem + router provided by ATT
  • Synology NAS DS918+ that runs my Plex Media Server
  • Roku Ultra connected to the TV
  • Google Home Mini
  • TP-Link bulbs
I needed to buy these for my new setup —
  • Raspberry-Pi kit with power adapter (I bought one by V-Kits because I liked the clear cover)
  • SD card (I bought Samsung 32GB EVO Plus Class 10 Micro SDHC because it was recommended online. Pi needs SDHC). If you do not have an SD card reader on your computer, you would also need a USB adapter.
Let’s dig into the setup. I installed PiHole to blocks ads and trackers on all devices across my entire home network. I set up PiVPN because my Arris router does not provide a very user friendly port forwarding interface so it’s easier to just forward one port required for VPN and then access all my home devices through the VPN when on external networks. It also prevents my devices from being accessed directly from the internet, adding another layer of security. If you do not care about accessing your devices from outside the network, you can skip the PiVPN installation.

Installing PiHole

PiHole developers have made its setup really easy but starting with a blank Pi takes a few initial steps — installing an OS on your Pi like Raspbian-lite, making sure SSH is enabled so you don’t need to connect a keyboard and finally installing PiHole. You can either follow the detailed instructions in Jeff Geerling article for this or I have provided the key steps below.
  1. Set up your Pi kit according to the kit instructions. Connect it with your router through an Ethernet cable.
  2. If you have a Macbook with an SD card reader, you can set up the SD card before inserting it into the Pi.
    Install Raspbian-lite (the Linux-based OS for your Pi) and enable SSH using diskutil as shown below and described by Jeff Geerling if you have MacOS or a very similar procedure on Linux (with a slight difference only during the Raspbian installation). Do not install PiHole right now.
    First download Raspbian Lite, then in Terminal on your Macbook after inserting the SD card, use diskutil list to identify SD card disk like /dev/disk2, then unmount it using unmount/dev/disk2, and write the downloaded Raspbian image from its location like Downloads using sudo dd if=raspbian-image.img of=/dev/rdisk2 bs=1m noting the extra r in the SD card diskname. Once the image is successfully written, you will see the SD card on your Macbook as a boot drive. Enable ssh by typing touch /Volumes/boot/ssh.
  3. After ejecting the SD card, insert it into the Pi and power the Pi on.
  4. Go to your router settings and ensure that the Pi gets a static IP. I also recommend disabling IPv6 on your router since after my setup, I noticed that some of the queries were leaking through IPv6 and since it isn’t possible to fix a static IPv6 for the Pi on my router. If you disable IPv6, restart both the router and the Pi before continuing.
  5. Prepare the Pi for installing PiHole by connecting to your Pi using SSH from your laptop Terminal— ssh pi@ip_address. Specify the static IP address of your Pi in the configuration file using sudo nano /etc/dhcpcd.conf and adding the following statements to the end — 
    interface eth0
    static ip_address=ip_address
    static routers=router_ip
    static domain_name_servers=subnet mask

    For an ATT router similar to mine, the router address is 192.168.1.254 and subnet mask over which local IPs are allocated is 192.168.1.64.
    Reboot the Pi using sudo reboot and configure it using sudo raspi-config. Reboot again and reconnect using ssh.
  6. Install PiHole using the step-by-step process after invoking the following command from the PiHole GitHub — 
    curl -sSL https://install.pi-hole.net | bash
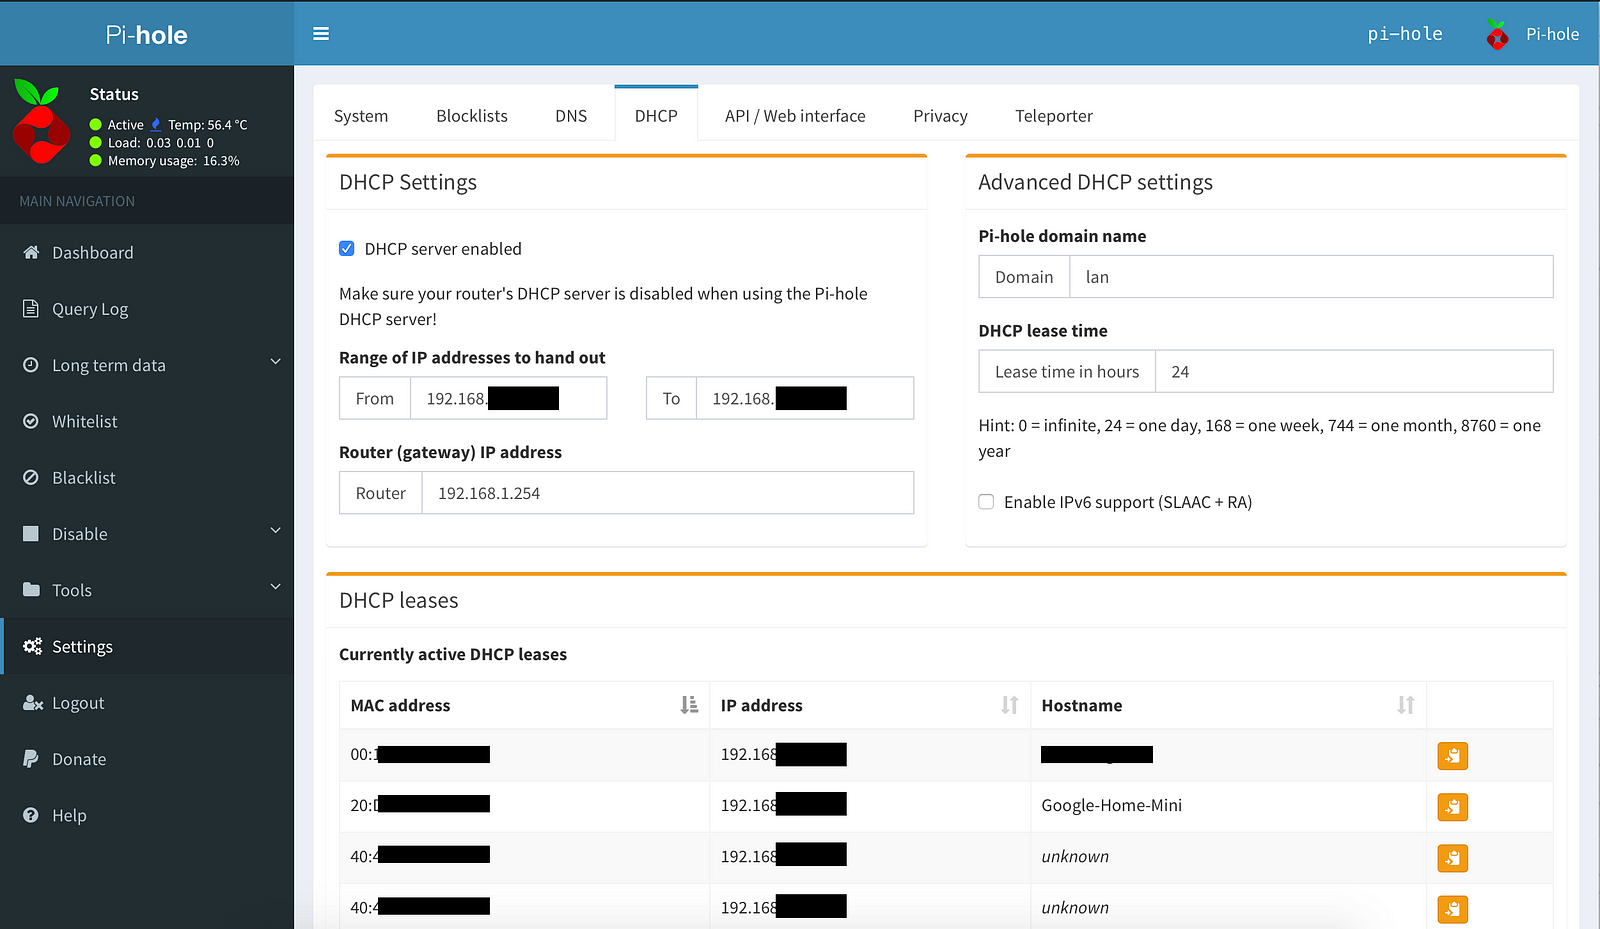
  7. After the setup is complete, the PiHole needs to be activated on all devices so they are using the PiHole DNS for web queries. If you have a router like mine that does not allow you to change DNS, then you have to use the DHCP approach to enable PiHole on your network. Connect to the PiHole web dashboard from your laptop through http://192.x.x.x/admin/ replacing the address with your PiHole IP. In Settings → DHCP, enable DHCP server, provide the same range as your router’s DHCP and the IP address of your router. Then, go to your router settings and disable DHCP there. If you disabled IPv6 on your router, also disable IPv6 in the PiHole’s DHCP settings.
  8. Restart your router, Pi, and all the connected devices in that order.
  9. All your devices should now be getting their DHCP leases from the PiHole. You can verify this by going back into the PiHole settings and ensuring all devices show on the list of DHCP leases. If you want to assign static IP to certain devices, you can do that here as well.
  10. Make sure your devices with an option to change DNS are using the default DNS or set their DNS to the Pi’s IP address. All your traffic should now be routing through the PiHole which is blocking all domains on its blacklist.
  11. If you want to go beyond the default blocklist domains, you can add more lists in Settings → Blocklists in the PiHole dashboard. WaLLy3k has a good repository of blocklists. After modifying the blocklists, either use the Save and Update option or go to Tools → Update Gravity to activate the lists.
  12. PiHole web dashboard is your friend! Enjoy exploring all the blocked domains getting pinged every few seconds from devices that you thought were not even turned on.


My DHCP settings on the PiHole dashboard

Installing PiVPN

PiVPN developers were inspired by PiHole to create an easy to setup step-by-step installation of OpenVPN server on your Pi. A VPN would allow you to connect to local devices on your home network from external networks, while keeping your devices hidden from the internet. To set up PiVPN on the same Pi as the PiHole —
  1. Set up port forwarding for a port that will be used for the VPN connection on your router. The default OpenVPN port is 1194 UDP, but for higher security, it’s recommended to forward a non-standard UDP port.
  2. I found the article by Gus on PiMyLifeUp to be the most helpful in setting up an OpenVPN server through PiVPN on my Pi. Make sure to use the same port during the setup as you selected in the previous step.
    After connected to the Pi through ssh, enter the following command and follow the installation steps — 
    curl -L https://install.pivpn.io | bash
    During the setup, to use the DNS I set up using PiHole when connected to the VPN, I used the Custom DNS option and entered the local IP address of my Pi. I tried using 127.0.0.1 as the DNS so I wouldn't have to change the OpenVPN settings if the IP address of my Pi changes, but this did not work. If you do not want to use PiHole when connected to the VPN server, you can select one of the other DNS providers from the list. You’ll still be able to connect to local devices, but internet traffic will be routed through your selected DNS.
  3. After the OpenVPN server is set up on your Pi, you’ll need to create VPN clients to use on devices that you would use to connect to the VPN server.
    I created a client for my Macbook using sudo pivpn add. To download the client on our Macbook, connect to the Pi using sftp and get the *.ovpn file that you created.
    sftp pi@ip.add.re.ss
    get /home/pi/ovpns/yourClientName.ovpnOn my MacBook, I used Viscosity to add the ovpn connection but you can use any OpenVPN client of your choice.
  4. After you set up a connection from your client from an outside network, you will be able to access your local devices like your NAS, backup disk, PiHole web dashboard or the Pi using SSH. However, if you access the internet, you will notice that the queries are not logged in the PiHole which means that the VPN connection is not using the PiHole for DNS even if you selected the PiHole’s DNS suring the setup. If you don’t care about using the PiHole for DNS, you are done but if you would like to use the PiHole, follow the steps in the next section.

Routing your VPN traffic through the PiHole

When connected to the VPN, if you would like to use your PiHole for DNS, you need to follow a few extra steps —
  1. You should have set up your DNS provider as the IP address of the PiHole during the setup of the VPN. If you didn’t, you can change it in the next step.
  2. I had to combine information from multiple links to get it to successfully work. The majority of instructions came from the last section of the article by Marc Stan requiring me to modify /etc/pihole/setupVars.conf and add /etc/dnsmasq.d/02-ovpn.conf. In 02-ovpn.conf, I added two lines unlike the original instructions
    interface=eth0
    interface=tun0

    Without the above modification, I was completely unable to connect to the internet on my local network or to any other devices although the connection through the VPN was working fine.
    Finally, if you had not changed the DNS during setup, modify /etc/openvpn/server.conf as described in Marc’s article.
  3. Some links refer to PIVPN’s official FAQ for setting up PiVPN with PiHole. However, when I implemented this, I was both unable to get VPN traffic routed through PiHole and was getting query leaks even when connected on local network. I would recommend not changing the /etc/dnsmasq.conf as suggested in the FAQ.
To test if everything is working as intended, look for queries from your connected devices on the PiHole web dashboard when connected on the local network, or from the VPN clients (generally shown as 10.0.8.x) when connected to the OpenVPN server from an external network.
After this setup, I was able to shut down my previously forwarded ports that I was using to connect to my NAS and to access Plex because I only need to forward my VPN port and connect to the VPN for full access to any of the local devices from anywhere in the world!

Side note if you have TP-Link bulbs with a Google Home

I realized that I could successfully blacklist devs.tplinkcloud.com that my TP-link bulbs are pinging every few seconds, except if I disconnected my bulbs and reconnected them, I was not able to control them through the Google Home, though I could still control them from the Kasa app. To fix this, I disabled the PiHole from its web dashboard for a few seconds and disconnected and reconnected the bulbs. When the bulb restarts, it sends a few queries that are not blocked on the disabled PiHole. After you see these queries, you can re-enable the PiHole as this registration only needs to happen once after a bulb restart.

After my PiHole setup was complete, I started noticing the extent of queries being sent out by my home devices. When using Roku, it send out over 7000 queries in 2 hours, roughly a query every second. Each of the TP-link bulbs query every few minutes. If apps are running in the background on Android, they will keep sending frequent queries even after I have stopped using them. I hope that as the discord around privacy increases, companies would start providing users more control over how they share their data, but until then, I am glad that developers have developed tools like PiHole and PiVPN to empower the daily user to control how and what data is gathered.

Fonte: https://medium.com/@timebarrier/setting-up-pihole-and-pivpn-for-privacy-and-security-in-the-iot-era-613dbbb29584
Continue reading →

Configurando o PiHole e o PiVPN para privacidade e segurança na era da IoT

0 comentários


Meu painel do PiHole
Ao longo do tempo, venho reunindo dispositivos da Internet das Coisas (IoT) que facilitam muito a configuração de um timer para a lavanderia, assistindo TV e desligando as luzes, mas também compartilham muitos dados sobre meu uso e muito mais. Sendo bastante consciente da privacidade, é a parte "muito mais" que começou a me incomodar, especialmente a política de privacidaderecentemente atualizada da Roku que descreve a coleta do nome da rede Wi-Fi e dados de conexão e informações sobre outros dispositivos conectados à mesma rede . Eu paguei o preço total pelo dispositivo Roku, por isso não estou oferecendo um serviço gratuito onde o usuário é o produto.Mas também não é razoável remover todos os dispositivos de IoT e esse tipo de coleta de dados só vai proliferar com o tempo, então decidi ter mais controle sobre como e quais dados eu compartilho, instalando o PiHole. Eu também instalei o PiVPN para tornar minha rede doméstica mais segura enquanto acessava de fora da minha casa.

Meu Raspberry-Pi e Synology NAS

Equipamentos e Configuração

Este é o equipamento que precisava para trabalhar com a minha configuração -
  • ARRIS BGW210–700 modem + roteador fornecido pela ATT
  • Synology NAS DS918 + que executa o meu Plex Media Server
  • Roku Ultra conectado à TV
  • Google Home Mini
  • Lâmpadas TP-Link
Eu precisava comprar isso para minha nova configuração -
  • Kit de framboesa-Pi com adaptador de energia (eu comprei um por V-Kitsporque eu gostei da capa clara)
  • Cartão SD (eu comprei Samsung 32GB EVO Plus Classe 10 Micro SDHC porque foi recomendado online. Pi precisa de SDHC). Se você não tiver um leitor de cartão SD no seu computador, você também precisará de um adaptador USB .
Vamos cavar a configuração. Instalei o PiHole para bloquear anúncios e rastreadores em todos os dispositivos em toda a minha rede doméstica. Configurei o PiVPN porque meu roteador Arris não fornece uma interface de encaminhamento de porta muito fácil de usar, por isso é mais fácil simplesmente redirecionar uma porta necessária para VPN e acessar todos os meus dispositivos domésticos por meio da VPN quando em redes externas. Isso também impede que meus dispositivos sejam acessados ​​diretamente da Internet, adicionando outra camada de segurança. Se você não se importa em acessar seus dispositivos de fora da rede, pode pular a instalação do PiVPN.

Instalando o PiHole

Os desenvolvedores do PiHole tornaram sua configuração realmente fácil, mas começar com um Pi em branco leva alguns passos iniciais - instalar um SO no seu Pi como o Raspbian-lite, certificando-se de que o SSH está habilitado para que você não precise conectar um teclado e finalmente instalar o PiHole . Você pode seguir as instruções detalhadas no artigo de Jeff Geerling para isso ou eu forneci as etapas principais abaixo.
  1. Configure o seu kit Pi de acordo com as instruções do kit. Conecte-o ao seu roteador através de um cabo Ethernet.
  2. Se você tiver um Macbook com um leitor de cartão SD, você pode configurar o cartão SD antes de inseri-lo no Pi. 
    Instale o Raspbian-lite (o SO baseado em Linux para o seu Pi) e habilite o SSH usando diskutilcomo mostrado abaixo e descrito por Jeff Geerlingse você tiver MacOS ou um procedimento muito semelhante no Linux (com uma ligeira diferença apenas durante a instalação do Raspbian). Não instale o PiHole agora mesmo. 
    Primeiro baixe Raspbian Lite , em seguida, no Terminal no seu Macbook depois de inserir o cartão SD, use diskutil listpara identificar o disco do cartão SD como /dev/disk2, em seguida, desmonte-o usando unmount/dev/disk2, e escreva a imagem Raspbian baixada de sua localização como Downloadsusar sudo dd if=raspbian-image.img of=/dev/rdisk2 bs=1manotando o r extrano cartão SD diskname. Quando a imagem for gravada com sucesso, você verá o cartão SD no seu Macbook como uma bootunidade. Ative o ssh digitando touch /Volumes/boot/ssh.
  3. Depois de ejetar o cartão SD, insira-o no Pi e ligue o Pi.
  4. Vá para as configurações do roteador e verifique se o Pi recebe um IP estático. Eu também recomendo desabilitar o IPv6 no seu roteador, pois após a minha configuração, notei que algumas das consultas estavam vazando através do IPv6 e já que não é possível corrigir um IPv6 estático para o Pi no meu roteador. Se você desabilitar o IPv6, reinicie o roteador e o Pi antes de continuar.
  5. Prepare o Pi para instalar o PiHole conectando ao seu Pi usando o SSH do seu laptop ssh pi@ip_addressEspecifique o endereço IP estático do seu Pi no arquivo de configuração usando sudo nano /etc/dhcpcd.confe adicionando as seguintes instruções ao final -  Para um roteador ATT semelhante ao meu, o endereço do roteador é e a máscara de sub-rede sobre quais IPs locais estão alocados Reinicie o Pi usando e configure-o usando Reinicialize novamente e reconecte usando ssh.
    interface eth0
    static ip_address=ip_address
    static routers=router_ip
    static domain_name_servers=subnet mask

    192.168.1.254192.168.1.64
    sudo rebootsudo raspi-config
  6. Instale o PiHole usando o processo passo-a-passo depois de invocar o seguinte comando do PiHole GitHub  - 
    curl -sSL https://install.pi-hole.net | bash
  7. Após a conclusão da configuração, o PiHole precisa ser ativado em todos os dispositivos para que eles usem o PiHole DNS para consultas na Web. Se você tem um roteador como o meu que não permite que você mude o DNS, então você tem que usar a abordagem DHCP para ativar o PiHole na sua rede. Conecte-se ao painel da Web do PiHole a partir do seu laptop, http://192.x.x.x/admin/substituindo o endereço pelo seu PiHole IP. Em Configurações → DHCP, ative o servidor DHCP, forneça o mesmo intervalo que o DHCP do roteador e o endereço IP do roteador. Em seguida, vá para as configurações do roteador e desative o DHCP lá. Se você desativou o IPv6 no roteador, desative também o IPv6 nas configurações DHCP do PiHole.
  8. Reinicie seu roteador, Pi e todos os dispositivos conectados nessa ordem.
  9. Todos os seus dispositivos devem estar recebendo suas concessões de DHCP do PiHole. Você pode verificar isso voltando às configurações do PiHole e garantindo que todos os dispositivos sejam exibidos na lista de concessões de DHCP. Se você quiser atribuir IP estático a determinados dispositivos, também pode fazer isso aqui.
  10. Certifique-se de que seus dispositivos com uma opção para alterar o DNS estejam usando o DNS padrão ou configurem seu DNS para o endereço IP do Pi. Todo o seu tráfego deve agora ser roteado através do PiHole, que está bloqueando todos os domínios em sua lista negra.
  11. Se você quiser ir além dos domínios padrão da lista de bloqueio, poderá adicionar mais listas em Configurações → Bloquear listas no painel do PiHole. O WaLLy3k tem um bom repositório de listas de bloqueio. Depois de modificar as listas de bloqueio, use a opção Salvar e Atualizar ou vá para Ferramentas → Atualizar Gravidade para ativar as listas.
  12. PiHole web dashboard é seu amigo! Divirta-se explorando todos os domínios bloqueados que recebem ping a cada poucos segundos em dispositivos que você achava que não estavam ativos.

Minhas configurações de DHCP no painel do PiHole

Instalando o PiVPN

Os desenvolvedores do PiVPN foram inspirados pelo PiHole para criar uma instalação fácil passo a passo do servidor OpenVPN no seu Pi. Uma VPN permitiria que você se conectasse a dispositivos locais em sua rede doméstica a partir de redes externas, mantendo seus dispositivos ocultos da Internet. Para configurar o PiVPN no mesmo Pi que o PiHole -
  1. Configure o encaminhamento de porta para uma porta que será usada para a conexão VPN em seu roteador. A porta padrão do OpenVPN é 1194 UDP, mas para maior segurança, é recomendado encaminhar uma porta UDP não padrão.
  2. Eu encontrei o artigo de Gus em PiMyLifeUp para ser o mais útil na criação de um servidor OpenVPN através PiVPN no meu Pi. Certifique-se de usar a mesma porta durante a configuração selecionada na etapa anterior. 
    Depois de conectado ao Pi através do ssh, digite o seguinte comando e siga os passos de instalação -  Durante a configuração, para usar o DNS eu configurei usando o PiHole quando conectado à VPN, usei a opção CustomDNS e inseri o endereço IP local do meu pi. Eu tentei usar
    curl -L https://install.pivpn.io | bash
    127.0.0.1como o DNS, então eu não teria que alterar as configurações do OpenVPN se o endereço IP do meu Pi fosse alterado, mas isso não funcionou. Se você não quiser usar o PiHole quando estiver conectado ao servidor VPN, poderá selecionar um dos outros provedores de DNS na lista. Você ainda poderá se conectar a dispositivos locais, mas o tráfego da Internet será roteado pelo DNS selecionado.
  3. Depois que o servidor OpenVPN estiver configurado no seu Pi, você precisará criar clientes VPN para usar em dispositivos que você usaria para se conectar ao servidor VPN. 
    Eu criei um cliente para o meu Macbook usando sudo pivpn addPara baixar o cliente em nosso Macbook, conecte-se ao Pi usando o sftp e obtenha o *.ovpnarquivo que você criou. No meu MacBook, usei Viscosity para adicionar a conexão ovpn, mas você pode usar qualquer cliente OpenVPN de sua escolha.
    sftp pi@ip.add.re.ss
    get /home/pi/ovpns/yourClientName.ovpn
  4. Depois de configurar uma conexão com seu cliente a partir de uma rede externa, você poderá acessar seus dispositivos locais, como o NAS, o disco de backup, o painel da Web do PiHole ou o Pi usando o SSH. No entanto, se você acessar a Internet, você notará que as consultas não estão registradas no PiHole, o que significa que a conexão VPN não está usando o PiHole para DNS, mesmo se você selecionou o DNS do PiHole para verificar a configuração. Se você não se importa em usar o PiHole para DNS, está pronto, mas se quiser usar o PiHole, siga os passos da próxima seção.

Roteando seu tráfego de VPN através do PiHole

Quando conectado à VPN, se você gostaria de usar seu PiHole para DNS, você precisa seguir alguns passos extras -
  1. Você deve ter configurado seu provedor de DNS como o endereço IP do PiHole durante a configuração da VPN. Se não o fez, você pode alterá-lo na próxima etapa.
  2. Eu tive que combinar informações de vários links para fazê-lo funcionar com sucesso. A maioria das instruções veio da última seção do artigo de Marc Stan, obrigando-me a modificar /etc/pihole/setupVars.confe adicionar /etc/dnsmasq.d/02-ovpn.confEm 02-ovpn.conf, eu adicionei duas linhas ao contrário das instruções originais Sem a modificação acima, eu estava completamente incapaz de se conectar à internet na minha rede local ou a quaisquer outros dispositivos, embora a conexão através da VPN estava funcionando bem. Finalmente, se você não alterou o DNS durante a instalação, modifique-o conforme descrito no artigo de Marc.
    interface=eth0
    interface=tun0


    /etc/openvpn/server.conf
  3. Alguns links referem-se ao FAQ oficial da PIVPN para configurar o PiVPN com o PiHole. No entanto, quando implementei isso, não consegui obter o tráfego da VPN roteado pelo PiHole e estava recebendo vazamentos de consulta mesmo quando conectado na rede local. Eu recomendaria não mudar o /etc/dnsmasq.conf sugerido no FAQ.
Para testar se tudo está funcionando conforme o esperado, procure consultas de seus dispositivos conectados no painel da web PiHole quando conectado na rede local ou dos clientes VPN (geralmente mostrados como 10.0.8.x) quando conectado ao servidor OpenVPN a partir de uma rede externa.
Após essa configuração, consegui desligar minhas portas anteriormente encaminhadas que estava usando para conectar-me ao meu NAS e acessar o Plex porque só preciso encaminhar minha porta VPN e conectar-me à VPN para ter acesso total a qualquer um dos dispositivos locais de qualquer lugar do mundo!

Nota lateral se você tiver lâmpadas TP-Link com uma Página inicial do Google

Percebi que consegui fazer com devs.tplinkcloud.comque as minhas lâmpadas TP-Link tivessem ping a cada poucos segundos, exceto se eu desconectei minhas lâmpadas e as reconectei, não consegui controlá-las pelo Google Home, embora eu ainda pudesse controlá-las a partir do Kasa. aplicativo. Para corrigir isso, desativei o PiHole de seu painel da web por alguns segundos e desconectei e reconectei as lâmpadas. Quando o bulbo é reiniciado, ele envia algumas consultas que não estão bloqueadas no PiHole desativado. Depois de ver essas consultas, você pode reativar o PiHole, pois esse registro só precisa acontecer uma vez após a reinicialização da lâmpada.

Depois que minha configuração do PiHole foi concluída, comecei a perceber a extensão das consultas sendo enviadas pelos meus dispositivos domésticos. Ao usar o Roku, ele envia mais de 7000 consultas em 2 horas, aproximadamente uma consulta a cada segundo. Cada uma das lâmpadas TP-link consulta a cada poucos minutos. Se os aplicativos estiverem sendo executados em segundo plano no Android, eles continuarão enviando consultas frequentes mesmo depois de eu ter parado de usá-los. Espero que à medida que a discórdia em torno da privacidade aumentar, as empresas passem a oferecer aos usuários mais controle sobre como eles compartilham seus dados, mas até lá ficamos felizes que os desenvolvedores tenham desenvolvido ferramentas como PiHole e PiVPN para capacitar o usuário diário a controlar como e o quê. os dados são coletados.

Fonte: https://medium.com/@timebarrier/setting-up-pihole-and-pivpn-for-privacy-and-security-in-the-iot-era-613dbbb29584
Continue reading →