Mostrando postagens com marcador Raspberry. Mostrar todas as postagens
sexta-feira, 12 de janeiro de 2024

Raspberrypi set static ip with network-manager

0 comentários

 Fonte: static-ip | wiki.pcw.de


#!/bin/bash

nmcli c mod "Wired connection 1" ipv4.addresses 192.168.31.16/24 ipv4.method manual

nmcli con mod "Wired connection 1" ipv4.gateway 192.168.31.1

nmcli con mod "Wired connection 1" ipv4.dns "192.168.31.16,192.168.31.17"

nmcli c down "Wired connection 1" && nmcli c up "Wired connection 1"

Continue reading →
terça-feira, 22 de agosto de 2023

PIHOLE-EXPORTER INSTALL

0 comentários

 fonte: https://jarrodstech.net/how-to-pihole-exporter-install-with-prometheus-and-grafana-on-ubuntu-20-04/

Releases: https://github.com/eko/pihole-exporter/releases/


 useradd --system --shell=/usr/sbin/nologin pihole_exporter

sudo mkdir /opt/pihole_exporter

mover o binario para esta pasta criada

sudo chmod -R 500 pihole_exporter/

sudo chown -R pihole_exporter:pihole_exporter pihole_exporter/

sudo nano /lib/systemd/system/pihole_exporter.service

  1. Paste in the following code, replace 10.0.0.4 and xyz with your pihole IP and password.
[Unit]
Description=pihole_exporter

[Service]
ExecStart=/opt/pihole_exporter/pihole_exporter-linux-amd64 -pihole_hostname 10.0.0.4 -pihole_password xyz WorkingDirectory=/opt/pihole_exporter
Restart=always
User=pihole_exporter

[Install]
WantedBy=multi-user.target
  1. Press ctrl + x and type y then enter to save the file
  2. Reload the system daemon systemctl daemon-reload
  3. Run the service service pihole_exporter start
  4. Enable it to run at start up systemctl enable pihole_exporter
  5. Lastly check the status systemctl status pihole_exporter – press q to exit this view


Continue reading →
domingo, 20 de agosto de 2023

Criando interface bridge para o virt-manager com nmcli

0 comentários

 Fonte: Criando interface bridge para o virt-manager com nmcli | SinergicaIT BLOG


Criando a interface bridge

o nmcli Network Manager Comand Line Interface, é p comando que faremos uso para criar e remover as interfaces bridgers

sudo nmcli connection  add type bridge ifname laboratorio1 autoconnect yes

Substitua o eth1 pela sua interface de rede que deseja fazer a bridger

sudo nmcli connection add type bridge-slave  ifname eth1  master  bridge-laboratorio1  autoconnect yes

Agora precisaremos desabilitar a Conexão cabeada 1, que está gerenciando o dispositivo eth1 para em seguida habilitar a nova conexão bridge-laboratorio1

Desabilitando a Conexão cabeada 1

nmcli connection down "Conexão cabeada 1"

Habilitando a bridge-laboratorio

nmcli connection up  "bridge-laboratorio1"
sudo systemctl  restart network-online.target
sudo systemctl  restart network.service

Caso tenha o networkd basta apenas restartá-lo

sudo systemctl  restart networkd.target

Apresentando a bridge ao virsh e virt-manager

Agora registraremos a nova interface para que seja visível durante a escolha de interfaces no virt-manager.

Este comando criará um arquivo xml chamado config-bridge.xml, contendo as informações necessárias para declarar uma interface no virsh e virt-manager.

cat <<EOF> config-bridge.xml
<network>
    <name>laboratorio1</name>
    <forward mode="bridge" />
    <bridge  name="laboratorio1" />
</network>
EOF

Os procedimentos abaixo, consistem em definir, iniciar, programar para auto iniciar durante o boot e também listar as novas interfaces

sudo virsh  net-define config-bridge.xml 
sudo virsh  net-start --network laboratorio1
sudo virsh net-autostart laboratorio1 
sudo virsh net-list --all
Continue reading →
quinta-feira, 1 de julho de 2021

Raspberry Pi: Install Apache + MySQL + PHP (LAMP Server)

0 comentários

 Fonte Raspberry Pi: Install Apache + MySQL + PHP (LAMP Server) | Random Nerd Tutorials


In this guide, you’ll learn how to install a LAMP (Linux, Apache, MySQL, PHP) server on a Raspberry Pi. LAMP is a software bundle that is used for web development. The Raspberry Pi will have Raspbian OS installed and you’ll use phpMyAdmin to easily manage your database through a web interface.

Install on Raspberry Pi Apache + PHP + MySQL + phpMyAdmin LAMP Server

Prerequisites

Before continuing with this tutorial:

If you like home automation and you want to build a complete home automation system, I recommend downloading my home automation course.

After having your Raspberry Pi board prepared with Raspbian OS, you can continue with this tutorial.

You can either run the next commands on a Raspberry Pi set as a desktop computer or using an SSH connection.

Updating and Upgrading

Before starting the installation procedure, open a Terminal window and run the following commands to update your Pi:

pi@raspberrypi:~ $ sudo apt update && sudo apt upgrade -y

Install Apache2 on Raspberry Pi

Apache2 is the most widely used web server software. Briefly, a web server is the software that handles requests to access a web page. Then, depending on the page you have requested, the server will generate the document to serve you (.html, .php, etc).

Apache2 on Raspberry Pi LAMP Server overview

To install Apache2 on your Raspberry Pi, run the next command:

pi@raspberrypi:~ $ sudo apt install apache2 -y
Raspberry Pi Install Apache2 LAMP Server

That’s it! Apache is now installed. To test your installation, change to the /var/www/html directory and list the files:

pi@raspberrypi:~ $ cd /var/www/html
pi@raspberrypi:/var/www/html $ ls -al
index.html

You should have an index.html file in that folder. To open that page in your browser, you need to know the Raspberry Pi IP address. Use:

pi@raspberrypi:/var/www/html $ hostname -I

Raspberry Pi change directory RPi IP Address

In my case, the Raspberry Pi IP address is 192.168.1.86. If you open your RPi IP address in any browser in your local network, a similar web page should load (http://192.168.1.86):

Raspberry Pi Apache2 Installed

Install PHP on Raspberry Pi

PHP is a server side scripting language. PHP (Hypertext Preprocessor) is used to develop dynamic web applications. A PHP file contains <?php … ?> tags and ends with the extension “.php“.

To install PHP on Raspberry Pi, run:

pi@raspberrypi:/var/www/html $ sudo apt install php -y

You can remove the index.html and create a PHP script to test the installation:

pi@raspberrypi:/var/www/html $ sudo rm index.html

pi@raspberrypi:/var/www/html $ sudo nano index.php

In your index.php file add the following code to echo the “hello world” message:

<?php echo "hello world"; ?>
Raspberry Pi Create PHP Test File Hello World

To save your file: press Ctrl+X, followed by y, and press Enter to exit.

Finally, restart Apache2:

pi@raspberrypi:/var/www/html $ sudo service apache2 restart

To test if Apache2 is serving .php files, open the Raspberry Pi IP address and it should display the “hello world” message from the index.php script created earlier.

Raspberry Pi test PHP File Hello World message web browser

If everything is working, you can remove index.php file from the /var/www/html directory:

pi@raspberrypi:/var/www/html $ sudo rm index.php

Install MySQL (MariaDB Server) on Raspberry Pi

MySQL (often pronounced My S–Q–L) is a popular open source relational database.

Install the MySQL Server (MariaDB Server) and PHP-MySQL packages by entering the following command:

pi@raspberrypi:/var/www/html $ sudo apt install mariadb-server php-mysql -y
pi@raspberrypi:/var/www/html $ sudo service apache2 restart

After installing MySQL (MariaDB Server), it’s recommend to run this command to secure your MySQL installation:

pi@raspberrypi:/var/www/html $ sudo mysql_secure_installation

This should appear in your Terminal window:

Raspberry Pi MySQL Database MariaDB Secure Installation
  • You will be asked Enter current password for root (type a secure password): press Enter
  • Type in Y and press Enter to Set root password
  • Type in a password at the New password: prompt, and press Enter. Important: remember this root password, as you will need it later
  • Type in Y to Remove anonymous users
  • Type in Y to Disallow root login remotely
  • Type in Y to Remove test database and access to it
  • Type in Y to Reload privilege tables now

When the installation is completed, you’ll see the message: “Thanks for using MariaDB!”.

Raspberry Pi MySQL Database-MariaDB Final Secure Installation

If you experience any error login into phpMyAdmin, you might need to create a new user to login. Those commands will create a new user with name (admin) and password (your_password).

pi@raspberrypi:/var/www/html $ sudo mysql --user=root --password
> create user admin@localhost identified by 'your_password';
> grant all privileges on *.* to admin@localhost;
> FLUSH PRIVILEGES;
> exit;

Install phpMyAdmin on Raspberry Pi

phpMyAdmin is a free software tool written in PHP, intended to handle the administration of MySQL using a web interface.

To install phpMyAdmin on a Raspberry Pi, type the following command into the terminal:

pi@raspberrypi:/var/www/html $ sudo apt install phpmyadmin -y

PHPMyAdmin installation program will ask you few questions. We’ll use the dbconfig-common.

  • Select Apache2 when prompted and press the Enter key
  • Configuring phpmyadmin? OK
  • Configure database for phpmyadmin with dbconfig-common? Yes
  • Type your password and press OK
Raspberry Pi install phpMyAdmin

Enable the PHP MySQLi extension and restart Apache2 for changes to take effect:

pi@raspberrypi:/var/www/html $ sudo phpenmod mysqli
pi@raspberrypi:/var/www/html $ sudo service apache2 restart

When you go to your RPi IP address followed by /phpmyadmin (in my case http://192.168.1.86/phpmyadmin), you’ll probably see the “Not Found” error page in your browser:

Failed to open phpMyAdmin Raspberry Pi

If that’s the case, you’ll have to move the phpmyadmin folder to /var/www/html, run the next command:

pi@raspberrypi:/var/www/html $ sudo ln -s /usr/share/phpmyadmin /var/www/html/phpmyadmin

Now, if you list the files, it should return the phpmyadmin folder:

pi@raspberrypi:/var/www/html $ ls
phpmyadmin
Raspberry Pi move phpMyAdmin to /var/www/html phpMyAdmin folder

Reload your web page (http://192.168.1.86/phpmyadmin), your should see the login page for phpMyAdmin web interface::

Raspberry Pi Open phpMyAdmin Login Page

Enter your defined username (it should be Username = root) and the password you defined during the installation.

Press the Go button to login. A new page loads:

Raspberry Pi Open phpMyAdmin Logged in Page

That’s it! Your Raspberry Pi board is prepared with a LAMP server: Apache2, MySQL, PHP. We’ve also decided to include phpMyAdmin in this installation for an easier database management through a web interface.

Optional Step (but recommended)

To manage your web pages, you should change the permissions for your /var/www/html/ folder. To do this, run the following commands:

pi@raspberrypi:~ $ ls -lh /var/www/
pi@raspberrypi:~ $ sudo chown -R pi:www-data /var/www/html/
pi@raspberrypi:~ $ sudo chmod -R 770 /var/www/html/
pi@raspberrypi:~ $ ls -lh /var/www/

After running these commands, you’ll see something as follows:

Raspberry-Pi change var www html folder
Continue reading →
domingo, 7 de fevereiro de 2021

Como configurar o compartilhamento do Samba Server no Ubuntu 20.04 Focal Fossa Linux

0 comentários

 goto-linux.com | Como configurar o compartilhamento do Samba Server no Ubuntu 20.04 Focal Fossa Linux (goto-linux.com)


O objetivo deste tutorial é configurar um servidor Samba básico no Ubuntu 20.04 para compartilhar diretórios pessoais do usuário, bem como fornecer acesso anônimo de leitura e gravação ao diretório selecionado.

Existem inúmeras outras configurações possíveis do Samba, no entanto, o objetivo deste guia é começar com alguns princípios básicos que podem ser expandidos posteriormente para implementar mais recursos para atender às suas necessidades.

Neste tutorial, você aprenderá:

  • Como instalar o servidor Samba
  • Como configurar o compartilhamento básico do Samba
  • Como compartilhar diretórios pessoais do usuário e diretório anônimo público
  • Como montar o compartilhamento Samba no MS Windows 10
Como configurar o compartilhamento do Samba Server no Ubuntu 20.04 Focal Fossa Linux

Requisitos e convenções de software usados

Requisitos de software e convenções de linha de comando do Linux
CategoriaRequisitos, convenções ou versão de software usada
SistemaUbuntu 20.04 Focal Fossa instalado ou atualizado
ProgramasSamba
De outrosAcesso privilegiado ao seu sistema Linux como root ou através do sudocomando
Convenções# - requer que determinados comandos linux sejam executados com privilégios de root, diretamente como usuário root ou pelo uso do sudocomando
$ - requer que determinados comandos linux sejam executados como usuários regulares sem privilégios

Como configurar o compartilhamento do Samba Server no Ubuntu 20.04, instruções passo a passo

  1. Vamos começar pela instalação do servidor Samba. Esta é uma tarefa bastante trivial. Primeiro, instale o taskselcomando se ele ainda não estiver disponível no sistema Ubuntu 20.04. Depois de pronto, use taskselpara instalar o servidor Samba.
    $ sudo apt install tasksel
    $ sudo tasksel install samba-server
    
  2. Começaremos com um novo arquivo de configuração limpa, enquanto também mantemos o arquivo de configuração padrão como um backup para fins de referência. Execute os seguintes comandos linux para fazer uma cópia de um arquivo de configuração existente e criar um novo /etc/samba/smb.confarquivo de configuração:
    $ sudo cp /etc/samba/smb.conf /etc/samba/smb.conf_backup
    $ sudo bash -c 'grep -v -E "^#|^;" /etc/samba/smb.conf_backup | grep . > /etc/samba/smb.conf'
    
  3. O Samba possui seu próprio sistema de gerenciamento de usuários. No entanto, qualquer usuário existente na lista de usuários do samba também deve existir no /etc/passwdarquivo. Se o usuário do sistema ainda não existir, portanto, não poderá ser localizado no /etc/passwdarquivo, primeiro crie um novo usuário usando o useraddcomando antes de criar qualquer novo usuário do Samba.

    Uma vez que seu novo usuário do sistema, por exemplo. linuxconfigsair, use o smbpasswdcomando para criar um novo usuário do Samba:
    $ sudo smbpasswd -a linuxconfig
    New SMB password:
    Retype new SMB password:
    Added user linuxconfig.
    
  4. O próximo passo é adicionar o compartilhamento do diretório inicial. Use seu editor de texto favorito, ex. atom , sublime , para editar nosso novo /etc/samba/smb.confarquivo de configuração do samba e adicionar as seguintes linhas ao final do arquivo:
    [homes]
       comment = Home Directories
       browseable = yes
       read only = no
       create mask = 0700
       directory mask = 0700
       valid users = %S
    
  5. Opcionalmente, adicione um novo compartilhamento Samba de leitura e gravação disponível ao público, acessível por usuários anônimos / convidados. Primeiro, crie um diretório que você deseja compartilhar e altere sua permissão de acesso:
    $ sudo mkdir /var/samba
    $ sudo chmod 777 /var/samba/
    
    Quando estiver pronto, abra novamente o /etc/samba/smb.confarquivo de configuração do samba e adicione as seguintes linhas ao final do arquivo:
    [public]
      comment = public anonymous access
      path = /var/samba/
      browsable =yes
      create mask = 0660
      directory mask = 0771
      writable = yes
      guest ok = yes
    
  6. Verifique sua configuração atual. Seu /etc/samba/smb.confarquivo de configuração do samba deve, neste estágio, parecer com o abaixo:
    [global]
       workgroup = WORKGROUP
       server string = %h server (Samba, Ubuntu)
       log file = /var/log/samba/log.%m
       max log size = 1000
       logging = file
       panic action = /usr/share/samba/panic-action %d
       server role = standalone server
       obey pam restrictions = yes
       unix password sync = yes
       passwd program = /usr/bin/passwd %u
       passwd chat = *Enter\snew\s*\spassword:* %n\n *Retype\snew\s*\spassword:* %n\n *password\supdated\ssuccessfully* .
       pam password change = yes
       map to guest = bad user
       usershare allow guests = yes
    [printers]
       comment = All Printers
       browseable = no
       path = /var/spool/samba
       printable = yes
       guest ok = no
       read only = yes
       create mask = 0700
    [print$]
       comment = Printer Drivers
       path = /var/lib/samba/printers
       browseable = yes
       read only = yes
       guest ok = no
    [homes]
       comment = Home Directories
       browseable = yes
       read only = no
       create mask = 0700
       directory mask = 0700
       valid users = %S
    [public]
      comment = public anonymous access
      path = /var/samba/
      browsable =yes
      create mask = 0660
      directory mask = 0771
      writable = yes
      guest ok = yes
    
  7. Nossa configuração básica do servidor Samba está concluída. Lembre-se de sempre reiniciar o servidor samba, após qualquer alteração no /etc/samba/smb.confarquivo de configuração:
    $ sudo systemctl restart smbd
    
  8. (opcional) Vamos criar alguns arquivos de teste. Depois que montarmos com êxito nossos compartilhamentos Samba, os arquivos abaixo deverão estar disponíveis para nossa disposição:
    $ touch /var/samba/public-share 
    $ touch /home/linuxconfig/home-share 
    
  9. Nesta fase, estamos prontos para voltar nossa atenção para o MS Windows. A montagem de diretórios de unidades de rede pode ser um pouco diferente para cada versão do MS Windows. Este guia usa o MS Windows 10 na função de um cliente Samba.
    Diretório inicial do usuário de montagem
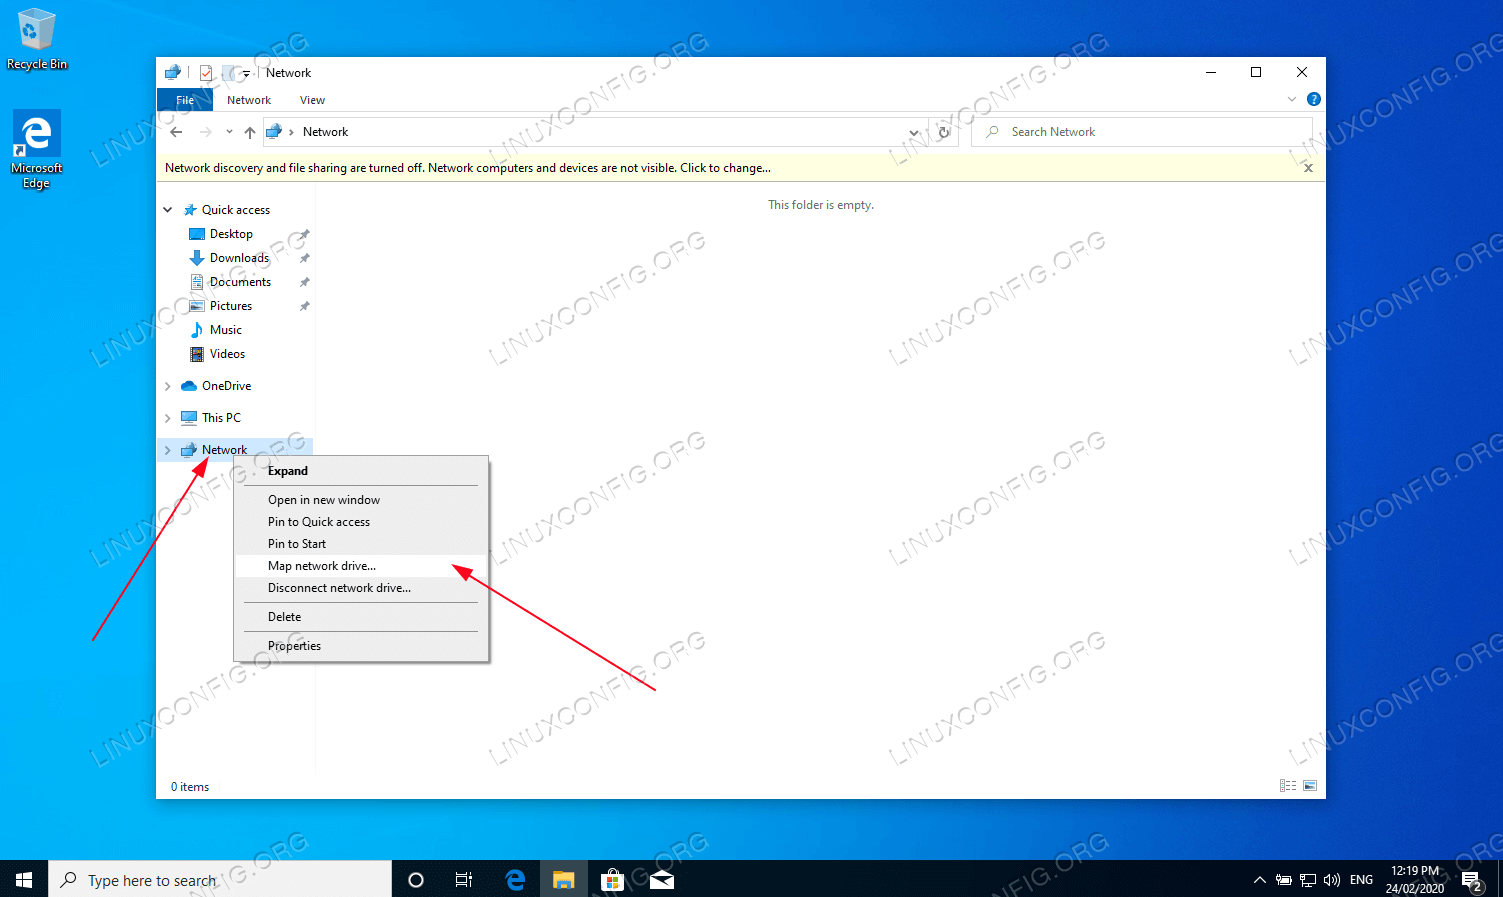
    Para começar, abra Windows Explorer-o, clique com o botão direito do mouse Networke clique na Map network drive...guia.


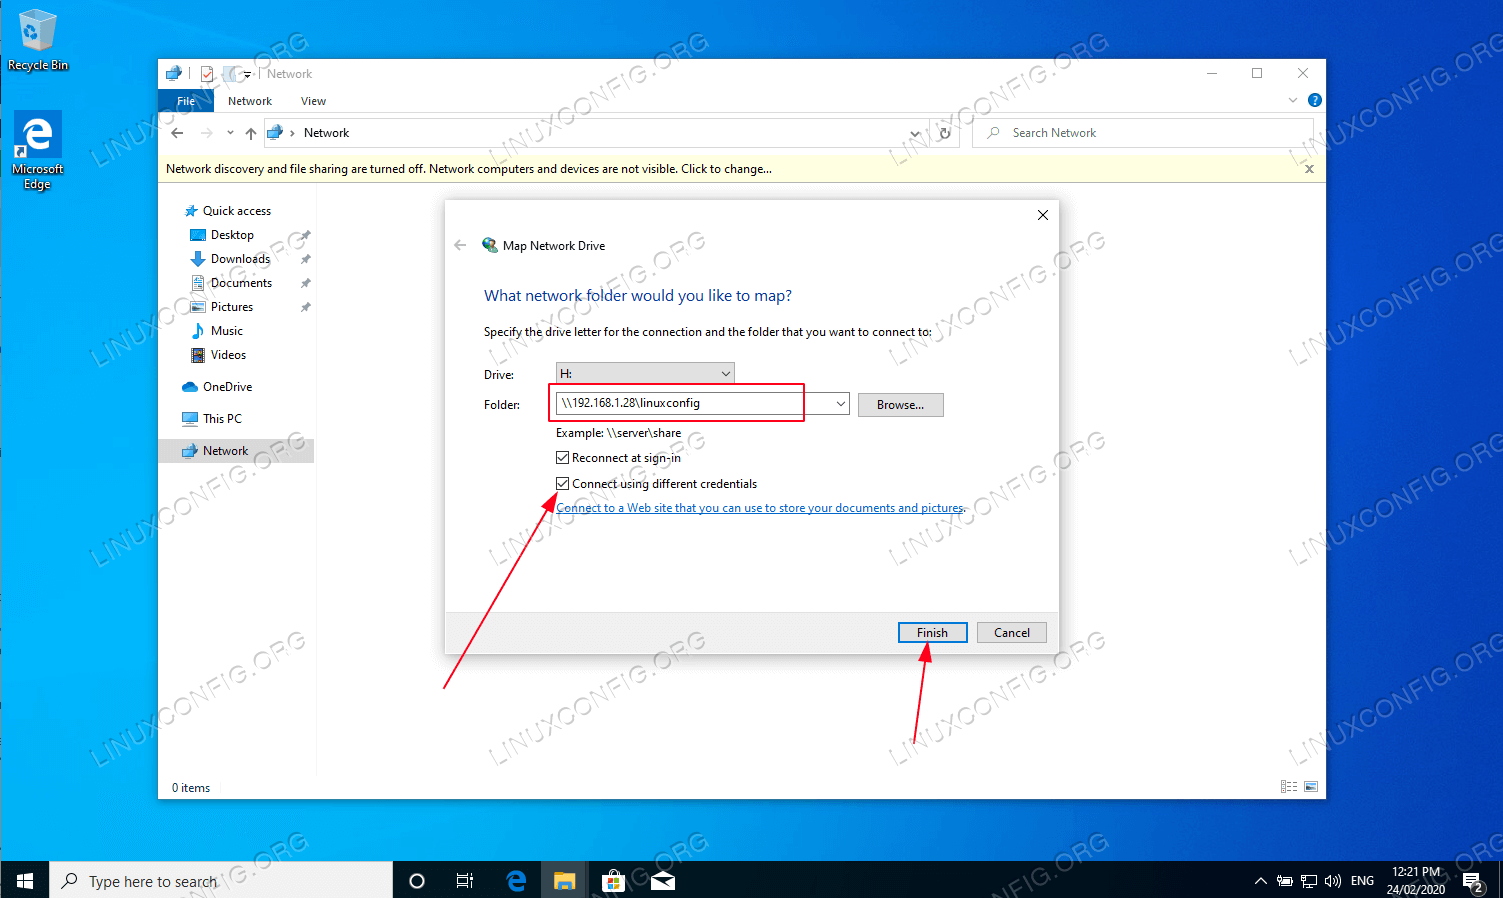
  10. Conecte-se usando credenciais diferentes
    Selecione a letra da unidade e digite o local de compartilhamento do Samba, que é o endereço IP ou o nome do host do servidor Samba, seguido pelo nome do diretório inicial do usuário. Marque Connect using different credentialsse seu nome de usuário e senha forem diferentes dos criados anteriormente na Etapa 3.


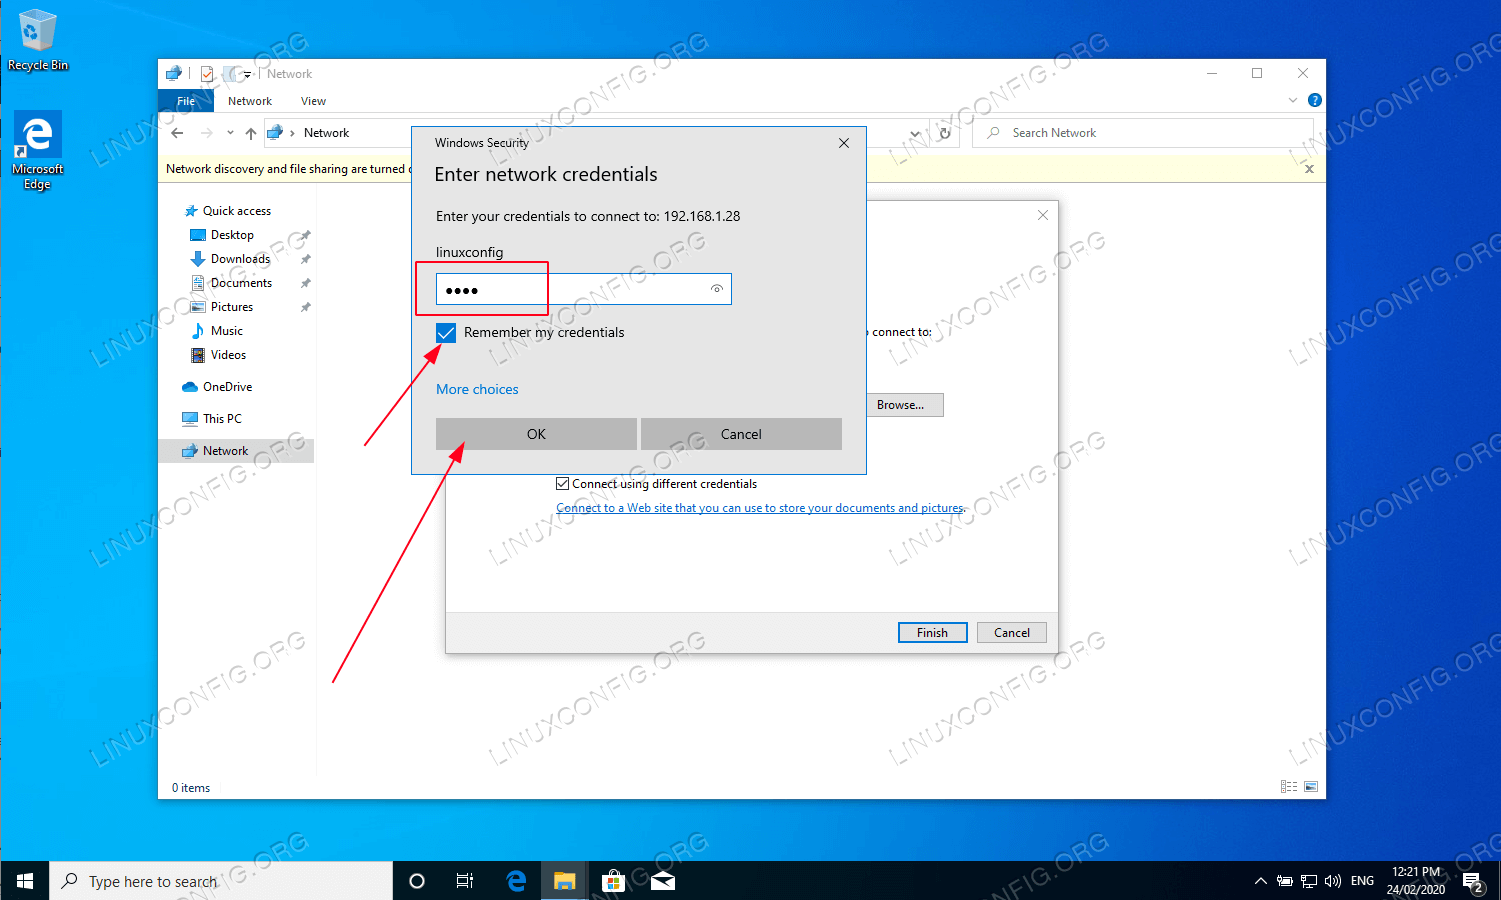
  11. Digite a senha do usuário
    Digite a senha do usuário conforme criada na Etapa 3.


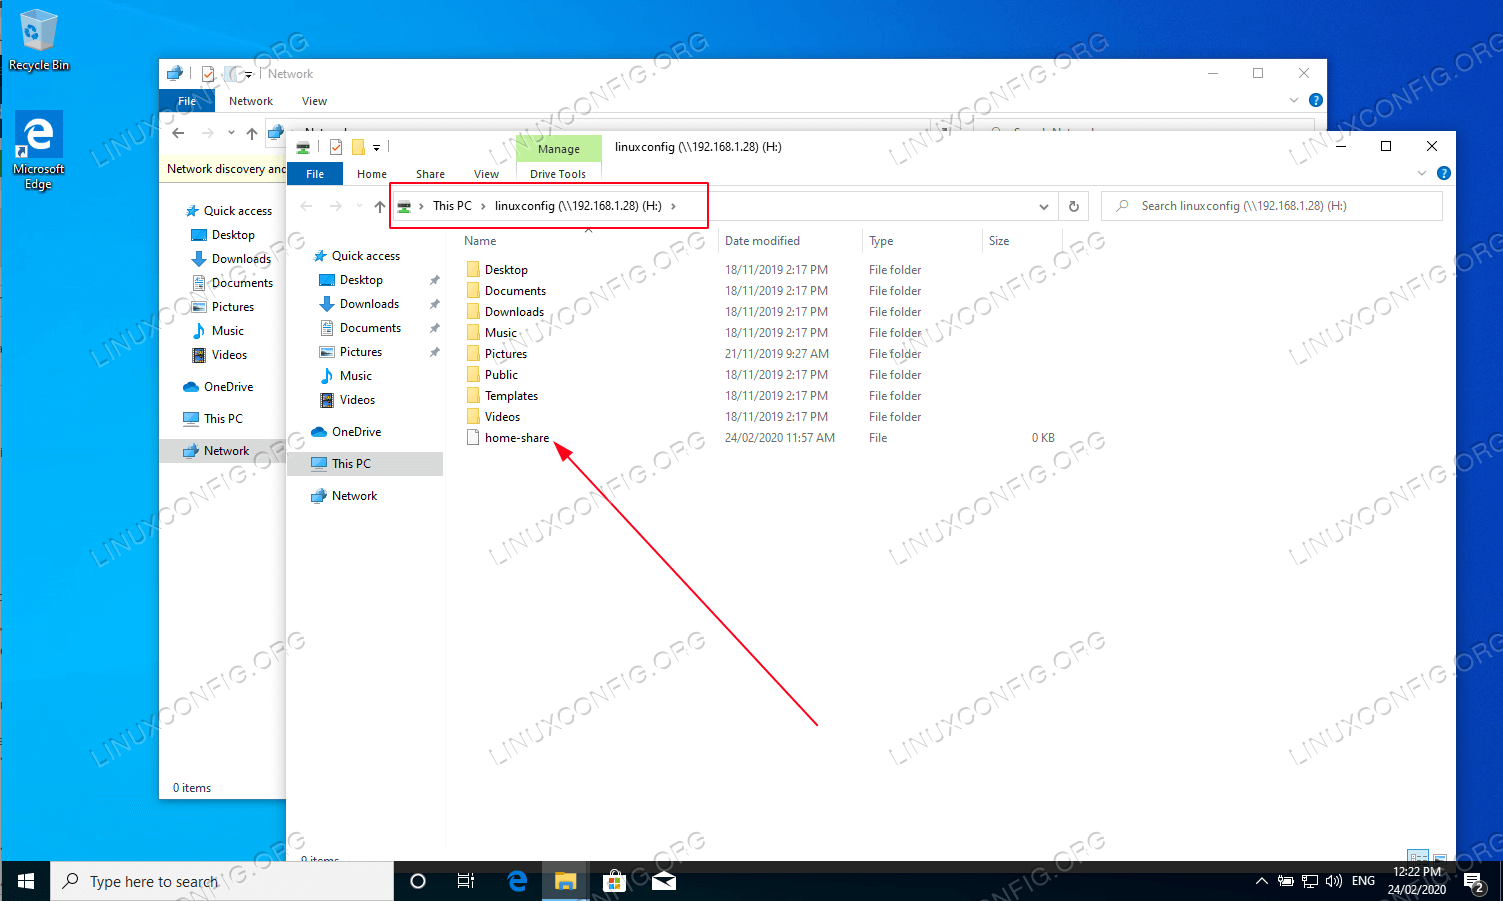
  12. Navegue pelo diretório samba inicial do usuário
    Navegue no diretório inicial do usuário. Você poderá ver o arquivo de teste criado anteriormente. Assim como você deve ser capaz de criar novos diretórios e arquivos.


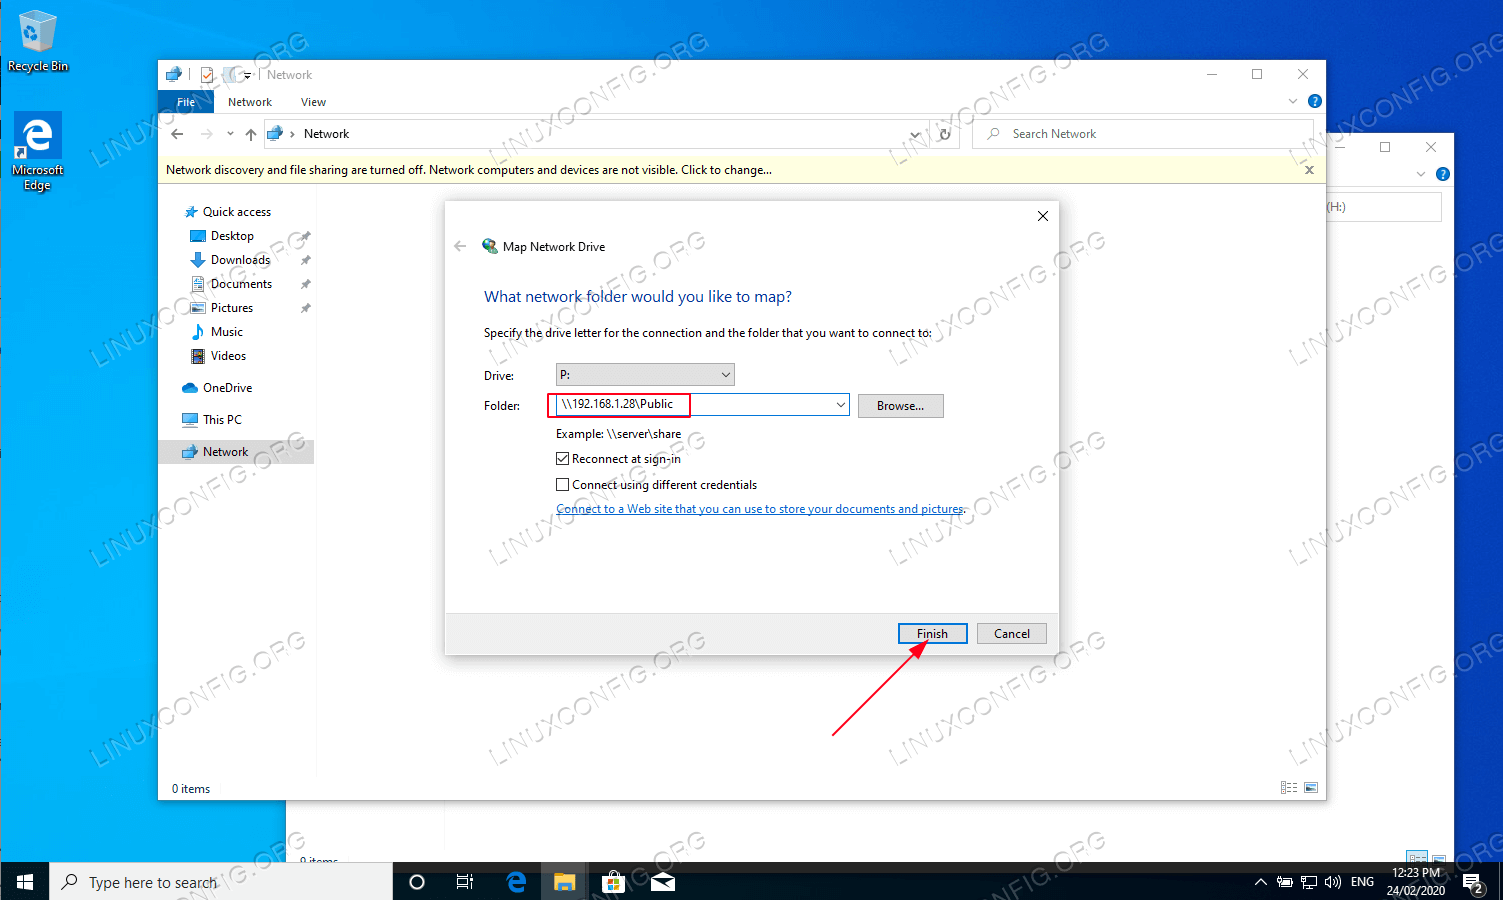
  13. Repita as etapas de montagem também para o compartilhamento de diretório samba publicamente anônimo
    Repita as etapas de montagem também para o compartilhamento de diretório samba publicamente anônimo.


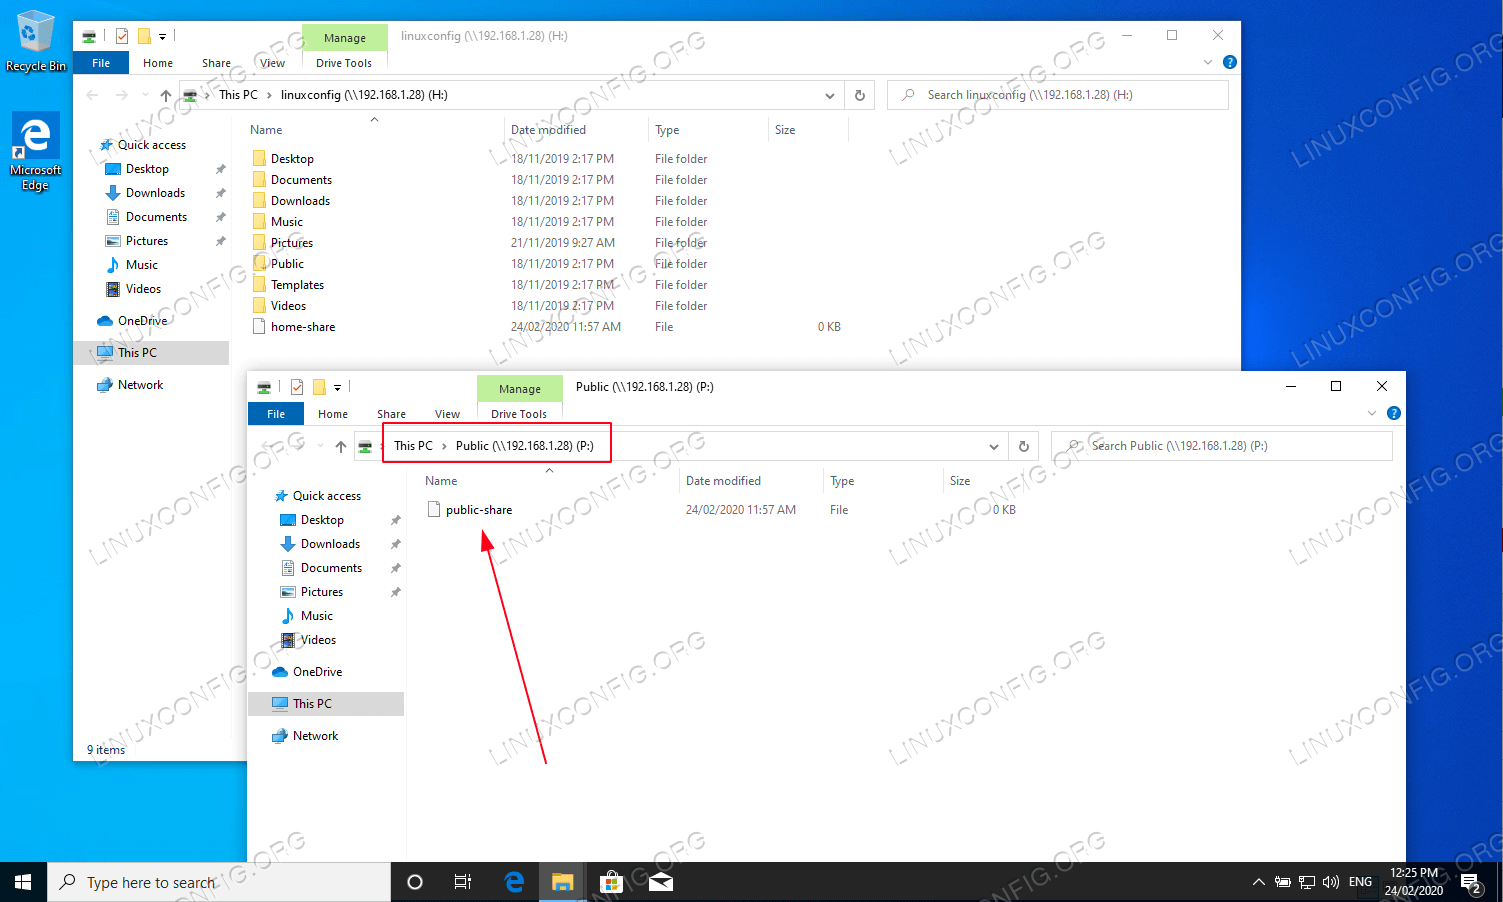
  14. Confirme se você pode acessar o diretório de compartilhamento Public samba
    Confirme que você pode acessar o diretório de compartilhamento samba público.
    Tudo feito. Agora, sinta-se à vontade para adicionar mais recursos à sua configuração do servidor de compartilhamento Samba.
Continue reading →

Labels