domingo, 17 de janeiro de 2021

How to install Nextcloud 20 on Ubuntu Server 20.04

0 comentários

How to install Nextcloud 20 on Ubuntu Server 20.04 - TechRepublic


How to install the necessary dependencies

The first thing to be done is the installation of the necessary dependencies. We'll break this into two sections. Log in to your server and access a terminal window. Install the first set of dependencies with the command:

sudo apt-get install apache2 mysql-server -y

When that completes, install the second group of dependencies with the command:

sudo apt-get install php zip libapache2-mod-php php-gd php-json php-mysql php-curl php-mbstring php-intl php-imagick php-xml php-zip php-mysql php-bcmath php-gmp -y

How to secure the MySQL database

With the dependencies out of the way, the next thing to be taken care of is securing the database server. Back at the terminal window, issue the command:

sudo mysql_secure_installation

Give MySQL a new admin password and answer the remaining questions with y (for yes).

How to create the database

Now we'll create the Nextcloud database and a database user. Log in to the MySQL console with the command:

sudo mysql -u root -p

Create the new database with the command:

CREATE DATABASE nextcloud;

Create a new user with the command:

CREATE USER 'nextcloud'@'localhost' IDENTIFIED BY 'PASSWORD';

Where PASSWORD is a unique and strong password.

Give the new user the necessary permissions with the command:

GRANT ALL PRIVILEGES ON nextcloud.* TO 'nextcloud'@'localhost';

Flush the privileges and exit the console with the commands:

FLUSH PRIVILEGES;
exit

How to download and unpack the Nextcloud file

In order to install Nextcloud, we have to first download the necessary zipped file. To do that, issue the command:

get actual version in Install – Nextcloud

Unpack that file with the command:

unzip nextcloud-20.0.0.zip

Move the newly-created nextcloud file to the Apache document root with the command:

sudo mv nextcloud /var/www/html/

Next, we'll give the Nextcloud folder the necessary ownership with the command:

sudo chown -R www-data:www-data /var/www/html/nextcloud

How to configure the web server

With the Nextcloud directory in place, we now have to make Apache aware of it. For that, we have to create a .conf file with the command:

sudo nano /etc/apache2/sites-available/nextcloud.conf

In that file, paste the following:

Alias /nextcloud "/var/www/html/nextcloud/"
<Directory /var/www/html/nextcloud/>
    Options +FollowSymlinks
    AllowOverride All
      <IfModule mod_dav.c>
        Dav off
      </IfModule>     

     SetEnv HOME /var/www/html/nextcloud
    SetEnv HTTP_HOME /var/www/html/nextcloud
</Directory>

Save and close the file. 

Enable the new site with the command:

sudo a2ensite nextcloud

We'll now enable the necessary Apache modules by issuing the command:

sudo a2enmod rewrite headers env dir mime

Finally, we'll change the PHP memory limit with the command:

sudo sed -i '/^memory_limit =/s/=.*/= 512M/' /etc/php/7.4/apache2/php.ini

Restart Apache with the command:

sudo systemctl restart apache2

How to finish the installation

Your venture into the command line is complete. Now you can open a browser and point it to http://SERVER_IP/nextcloud (where SERVER_IP is the IP address of the hosting server). You'll first be greeted by the web-based installer (Figure A).

Figure 

nc20a.jpg

The Nextcloud web-based installer.

Create a new admin user and fill out the details for the database, which will be:

  • Database user: nextcloud

  • Database password: The password you created for the nextcloud database user

  • Database name: nextcloud

Leave localhost as is and leave Install Recommended Apps checked.

After you've entered the information, click Finish Setup. When the installation completes, you'll find yourself logged in with the Admin user and on the new Nextcloud Dashboard (Figure B).

Figure B

nc20b.jpg

The new Nextcloud Dashboard awaits customization.


Continue reading →
quarta-feira, 6 de janeiro de 2021

Reparar o HD (Disco Rígido)

0 comentários

 Como reparar o HD isolando BadBlocks usando Linux ou Windows | Ariane Brandão (arianebrandao.github.io)


Primeiramente é interessante verificar se o HD contém badblocks, para então executar o comando para reparar. Precisamos saber qual partição do HD vamos testar, para isso, abrimos o terminal e digitamos o comando:

sudo fdisk -l

As partições então serão listadas, geralmente algo parecido com “/dev/sda1”. Você também pode usar o programa GParted (já vem instalado em algumas distros) para listar as partições do HD.

Verificando o disco

Para executar o teste por badblocks apenas por leitura de informações digite o comando no terminal, onde o X é substituído pelo número da partição:

sudo badblocks -sv -c 1024 /dev/sdaX

Este próximo comando testa o HD lendo, escrevendo e também verificando as informações, é um método mais completo e mais lento:

sudo badblocks -nsv -c 10240 /dev/sdaX

Isolando os badblocks

Antes de prosseguir, salve os dados importantes do seu HD em um lugar seguro. O próximo comando usa o método anterior e também formata a partição selecionada:

sudo badblocks -wsv -c 10240 /dev/sdaX

Explicando os parâmtros do comando:

-s = Mostra o avanço do procedimento
-v = verbose mode
-c 10240 = Verifica 10 mil blocos de HD por vez
-n = non-destructive read-write
-w = destructive write-mode

Lembrando que podem demorar horas para fazer a verificação por completo.

Continue reading →
segunda-feira, 4 de janeiro de 2021

Instalar por terminal o pacote de idiomas Português do Ubuntu

0 comentários

 sudo apt-get install language-pack-gnome-pt language-pack-pt-base

dpkg-reconfigure -f noninteractive locales
Continue reading →
domingo, 3 de janeiro de 2021

Script para controlar FAN case Argon One

0 comentários

 https://download.argon40.com/argon1.sh | bash

Continue reading →
segunda-feira, 28 de dezembro de 2020

Como instalar Samba no Ubuntu Server 20.04

0 comentários

 Como instalar Samba com Webmin no Ubuntu Server 20.04 - VMIA BLOG


Neste post iremos demonstrar a instalação do Samba (compartilhamento de arquivo) com Webmin (Interface de configuração de diversos servidores) no Linux Ubuntu Server 20.04 sem interface gráfica.

Os servidores Linux são muito bons em segurança e desempenho, a instalação do Ubuntu Server 20.04 tem somente 900MB. E pode ser executado em diversos computadores e máquina virtual. Não exige muito hardware.

O Samba é um ótimo programa para compartilhar arquivo no Linux que simula um servidor Windows e pode ser acessado por todos os sistemas operacionais. O Webmin é uma interface web que facilita a administração de diversos programas Linux, ao invés de ser administrador pela linha de comando uma interface visual ajuda muito.

Instalação Samba Ubuntu Server 20.04

1) Instalação TaskSel

sudo apt install tasksel

2) Instalação do Samba via tasksel

sudo tasksel install samba-server

3) Faça uma cópia do arquivo de configuração do samba, e crie outro somando os conteúdos.

sudo cp /etc/samba/smb.conf /etc/samba/smb.conf_backup

sudo bash -c ‘grep -v -E “^#|^;” /etc/samba/smb.conf_backup | grep . > /etc/samba/smb.conf’

4) Defina um usuário do samba e sua senha.

sudo smbpasswd -a vmia

5) Crie um diretório que terá os arquivos compartilhados
e defina permissão para acesso.

sudo mkdir /var/smb

sudo chmod 777 /var/smb/

6) Abra o arquivo smb.conf para edição e adicione
o trecho abaixo no final do arquivo.

sudo nano /etc/samba/smb.conf

ADICIONAR NO FINAL DO ARQUIVO

/***********************************************************************
[homes]
comment = Diretorio do Usuario
browseable = yes
read only = no
create mask = 0700
directory mask = 0700
valid users = %S


[public]
comment = Acesso publico
path = /var/smb/
browsable =yes
create mask = 0660
directory mask = 0771
writable = yes
guest ok = yes
**********************************************************************/

7) Reinicie o processo do Samba.

sudo systemctl restart smbd

Após o procedimento acima você já pode acessar os dois compartilhamentos criados.

Continue reading →
sábado, 26 de dezembro de 2020

How To Automount File Systems on Linux

0 comentários

 How To Automount File Systems on Linux - LinuxBabe


Today I’m going to show you how to automatically mount a drive at boot time in Linux. My laptop have one SSD and one mechanical drive. I install operating systems on SSD and store files on mechanical drive. So often times I need to mount the mechanical drive in file manager manually to access my mp3 and video files. Mounting drive manually is just a waste of time. So I’m going to show you an easy way to automount drive in Linux.

Step 1: Get the Name, UUID and File System Type

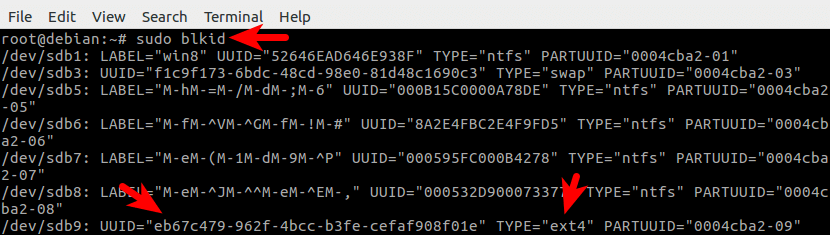
Open your terminal, run the following command to see the name of your drive, its UUID(Universal Unique Identifier) and file system type.

sudo blkid

sudo blkid command

In the output of this command, the first column is the name of your drives. The second column is the label of the drive (if you set a label for it) and the third column is the UUID of your drives.

First you need to know the name of the drive that is going to be automatically mounted. For example, the name of the drive that is going to be automatically mounted on my computer is /dev/sdb9.

Then you need to know it’s UUID and file system type. As you can see the UUID of /dev/sdb9 is eb67c479-962f-4bcc-b3fe-cefaf908f01e and the file system of /dev/sdb9 is ext4 which is the standard file system in Linux.

Step 2: Make a Mount Point For Your Drive

We are going to make a mount point under /mnt directory. Enter the following command,

sudo mkdir /mnt/<name-of-the-drive>

For example, I issued the following command:

sudo mkdir /mnt/sdb9

Step 3: Edit /etc/fstab File

Run the following command to edit the /etc/fstab file. Nano is a command line editor on Linux.

sudo nano /etc/fstab

We need to append one line of code at the end of the file. The format of this line of code is as follows:

UUID=<uuid-of-your-drive>  <mount-point>  <file-system-type>  <mount-option>  <dump>  <pass>

Note that you need to separate these items with Tab key. For example, I added the following line to the end of /etc/fstab.

UUID=eb67c479-962f-4bcc-b3fe-cefaf908f01e  /mnt/sdb9  ext4  defaults  0  2

/etc/fstab automount

If you want to automount a NTFS file system, here is an example.

UUID=<uuid-of-ntfs-file-system>   /mnt/ntfs   ntfs   defaults  0  2

Save and close the file. Then run the following command to see if it works.

sudo mount -a

So that’s how you automount a file system in Linux.

Some Explanation

For swap partitions, the mount point field should be specified as none.

The defaults mount option will give users read and write access to the file system.

The value of dump field is usually zero.

The pass field is used by the fsck program to determine the order in which filesystem checks are done at reboot time. As you can see in this file, the value of the pass field for the root file system is 1. Swap partitions do not need to be checked and the value for them is zero. All other file systems should have a value of 2. So I set the pass value as 2 for my drive.

Continue reading →

Comandos para o Samba

0 comentários
sudo cp /etc/samba/smb.conf /etc/samba/smb.conf_backup

sudo bash -c 'grep -v -E "^#|^;" /etc/samba/smb.conf_backup | grep . > /etc/samba/smb.conf'

Continue reading →