Fonte: KVM: Creating a bridged network with NetPlan on Ubuntu 22.04 | Fabian Lee : Software Engineer
In order to expose KVM virtual machines on the same network as your bare-metal Host, you need to enable bridged networking.
In this article, I’ll show how to implement KVM bridged networking on Ubuntu 22.04 using Netplan. This bridged network will expose the KVM Guest OS as a peer on the upstream network, with no limits on ingress/egress.
Prerequisites for Netplan
First, you need to have your system under Netplan control. If the yaml file in your “/etc/netplan” directory has a renderer of ‘networkd’, then your system is under Netplan control and you can continue.
# you want Netplan renderer of 'networkd' (not 'NetworkManager')
sudo grep -sr 'renderer' /etc/netplan
If your system is using NetworkManager, then see the notes at the bottom of this article for switching over to Netplan.
Prerequisites for libvirt/KVM
If you haven’t installed KVM on Ubuntu, you can follow the instructions in my article here.
Although we don’t directly require it for NetPlan, install the network bridge utilities package for debugging.
sudo apt install bridge-utils -y
Create host bridge using NetPlan
By creating a bridged network, you can have guest VMs share the network interface of the Host machine. In other words, the Host machine as well as the Guest virtual machine hosts can each have an IP address on the same subnet.
You need to use the tools provided at the OS level to create a network bridge on the Host. On older versions of Ubuntu, you would use ‘brctl‘, but on 18.04+ you can use Netplan.
Look at existing NetPlan
Go into the “/etc/netplan” directory and you should see a file named “01-netcfg.yaml” or “50-cloud-init.yaml” that looks something like:
network:
  version: 2
  renderer: networkd

  ethernets:
    enp1s0:
      dhcp4: false
      dhcp6: false
      addresses: [192.168.1.239/24]
      # gateway4 is deprecated, use routes instead
      routes:
      - to: default
        via: 192.168.1.1
        metric: 100
        on-link: true
      mtu: 1500
      nameservers:
        addresses: [8.8.8.8]
If instead you have a file named something like ’01-network-manager-all.yaml’ and the renderer is ‘NetworkManager’, rename it with an extension of ‘.old’ so it is not picked up anymore.
The definition above is for a host with a single physical NIC named ‘enp1s0’ (yours might be ‘eth0’ or ‘enp2s0’), static IP of 192.168.1.239 on the 192.168.1.1 network and using Google DNS servers at 8.8.8.8.
Created a bridge with Netplan
To create a bridged network, you need to disable the specific settings on the physical network, and instead apply them to the bridge. Make a backup of your old file before modifying.
cd /etc/netplan

# make backup
sudo cp 50-cloud-init.yaml 50-cloud-init.yaml.orig

# modify, add bridge
sudo vi 50-cloud-init.yaml
Below is an example showing how we take the physical network example above (physical interfaced named ‘enp1s0’, might be ‘eth0’ for your system), and created a bridge named ‘br0’ that has the same properties.
network:
  version: 2
  renderer: networkd

  ethernets:
    enp1s0:
      dhcp4: false
      dhcp6: false

  bridges:
    br0:
      interfaces: [enp1s0]
      addresses: [192.168.1.239/24]
      # gateway4 is deprecated, use routes instead
      routes:
      - to: default
        via: 192.168.1.1
        metric: 100
        on-link: true
      mtu: 1500
      nameservers:
        addresses: [8.8.8.8]
      parameters:
        stp: true
        forward-delay: 4
      dhcp4: no
      dhcp6: no
Then apply the new netplan with bridged network with the commands below. But be sure you have physical access to the host in case network connectivity needs to be investigated.
sudo netplan generate
sudo netplan --debug apply
You may temporarily lost network connectivity if you are connected over ssh after running the apply command. So be sure you have physical access to the console.
You can see the network entities at the OS level by using these commands:
# show compact list of interfaces 'br0' should now exist
sudo networkctl -a
sudo networkctl status br0

# bridge control, will now show new 'br0'
brctl show

# ip list
ip a show br0
# show host routes, default will be 'br0' to gateway
ip route

# show arp table (IP to MAC)
arp -n
Configure libvirt network to use existing bridge
Now with the network bridge created at the OS level, you can configure a libvirt network to use this bridge. Create a file named “host-bridge.xml” containing the following:
<network>
  <name>host-bridge</name>
  <forward mode="bridge"/>
  <bridge name="br0"/>
</network>
Then create the network using these commands:
# current list of libvirt networks
virsh net-list

# create libvirt network using existing host bridge
virsh net-define host-bridge.xml
virsh net-start host-bridge
virsh net-autostart host-bridge

# state should be active, autostart, and persistent
virsh net-list --all
VM assigned to this network will be treated just like any other peer host. For example, if your upstream gateway router is DHCP enabled, new VM will be assigned an IP from that pool if the guest OS is configured to use DHCP. Likewise, the guest OS can be configured to use a static IP from the same subnet as the host bridge.
KVM Guest OS
The last step is to configure a KVM Guest to use this network bridge.
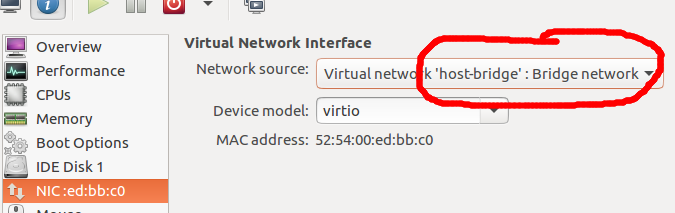
From virt-manager, select the network source ‘Virtual network host-bridge: Bridge network’ as shown above. Or if you ‘virsh edit’ the KVM guest, then set the <interface type=’network’> and <source network=’host-bridge’/> using similar values to below.
<interface type='network'>
    <source network='host-bridge'/>
    <model type='virtio'/>
    <address type='pci' domain='0x0000' bus='0x00' slot='0x03' function='0x0'/>
</interface>
Note that this only assigns the interface at the firmware level. You still have to ensure proper configuration at the Guest OS level in order to use DHCP or static IP.
Read my article on cloning Ubuntu guest VMs for tips, configuring older Ubuntu versions is well understood at this point but newer Ubuntu versions that use systemd for networking do not use the MAC address as the DHCP id which can lead to issues when cloning.